
In this article, we will be exploring deploying Red Hat OpenShift container platform on VMware Cloud Foundation 9.
Navigation
- Introduction
- Pre-requirements
- Caveats
- Cluster Creation
- Looking Deeper
- Destroy the cluster
- What’s Next?
Introduction
I have been running various Red Hat OpenShift environments on Bare Metal Cisco UCS B200 for a while now. You can see me take a spin around a couple of them as part of the recent webinar series. I have a soft spot for OCP, as although VCF9 comes with its own Tanzu container platform, which can run virtual machines on bare metal alongside containers, Broadcom’s offering is not as tightly integrated or “fully committed” as Red Hat’s to Kubernetes as an orchestrator.
I rejoice in Red Hat’s commitment to Kubernetes as a platform, similar to SUSE Virtualisation, it’s an all-in K8 environment. OCP nodes are built on Kubernetes on Red Hat Enterprise Linux Core OS (RHCOS), which is an immutable operating system built from the ground up for containers. With Tanzu, the container platform is configured post-deployment, on top of a traditional ESX hypervisor.
For this article, we will explore how to integrate VMware Cloud Foundation 9 with OpenShift using virtual machines. As they are virtual machines, we will be using them for containers only. To run VMs on Kubevirt, the host needs to be bare metal.
So why run OCP on VCF? Well, here are some reasons:
- You are invested in running containers and need platforms in various cloud providers, including a private cloud with a common interface.
- Your developers are already running a managed version of Red Hat OpenShift in their favourite hyperscaler, and they want a common platform in which they can pick and choose where workloads are deployed, either in public or private cloud.
- You’re concerned about security, and know that Red Hat as a container platform is very robust and secure by default.
- You want to break free from vendor lock-in with Tanzu and run containers in a platform-agnostic way. You’re currently on VMware, but you also want the flexibility to run services elsewhere. This approach supports long-term service continuity, giving your organisation the freedom to move between platforms over time without being constrained by a single vendor.
Of course, there will be cost implications to such a decision; you will be paying for VVF or VCF and then additionally for Red Hat OpenShift on top. However, for pure containers, you can use core-based licensing. Remember, with OpenShift, you only pay for the compute nodes, the control plane, and infra, and any cold or warm DR setup is included at no additional cost. So it may not be as expensive as you think. Let’s get to it.
Pre-requirements
Below are the bare bones requirements to do an OCP 4.21 Installer Provisioned Infrastructure (IPI) install using the vSphere provider. The vSphere provider will include a container storage interface, allowing you to provision persistent storage for containers on VMDK files. This is precisely the same as VVF/VCF with Tanzu. The deployment is against a DNS server on my Mikrotik router, so there are no dependencies on my Active Directory lab domain controllers being online.
- You must be running:
- Legacy vSphere 8.0 U1 or later.
- VCF 5.0 or later, including 9.0.
- VVF 9.0 or later.
- Make sure your vCenter and ESX environment are correctly synced with NTP.
- Virtual machines of hardware version 15 or later to use vSphere CSI.
- Prepare custom roles in vSphere for OpenShift as per this article. In the lab, I am using the root administrator@vsphere.local account, so I have not done this.
- Ideally, a Fedora or RHEL machine, where you can perform the base install.
- DHCP is preferred in the management network where the OCP nodes will be deployed. Nodes can be replaced, scaled up or down, so it’s more friendly to use DHCP. If you want to keep IP’s aligned, use DHCP reservations. Static IP addresses can be used if needed. To do this, you need to add custom YAML files.
- The network you use for the OCP nodes must have access to the vCenter API (TCP 443) for the container storage interface (CSI) to be able to attach VMDK disks to the nodes and ultimately to the pods. It’s also used for the container networking interface (CNI) when the cluster builds a cloud-controller-manager pod that is scheduled and connects to vCenter. As per this KB.
- Set aside two static IP addresses outside of DHCP for the KubeAPI and Ingress address.
- Create the required VMware DP port group with VLAN 109 to attach to the OCP nodes.
- Create DNS records in advance as shown below.
| Component | Record | Description |
| API VIP | api.home-ocp01.aclab.uk | Kubernetes API endpoint, this will ultimately point to the keepalived VIP which will run on each of the control plane nodes |
| Ingress VIP | *.apps.home-ocp01.aclab.uk | A wildcard entry in DNS, any services of type load balancer, Ingress, API Gateway, etc, will point to sub-records of this. Using a * is fully supported in Microsoft DNS. In this lab, the resolution is done on Mikrotik Router OS. |
For the Mikrotik router in the lab, the following statements were added to accommodate the new OCP network. The last two static addresses will allow everything to resolve things properly; Mikrotik allows a wildcard entry for all subdomains.
/interface vlan
add comment="OpenShift VMware Cluster" interface=bridge l3-hw-offloading=no name=vlan109 vlan-id=109
/ip address
add address=10.166.109.254/24 comment="OpenShift VMware Cluster" interface=vlan109 network=10.166.109.0
/ip pool
add comment="VLAN 109" name=vlan109 ranges=10.166.109.10-10.166.109.200
/ip dhcp-server
add address-pool=vlan109 interface=vlan109 name=vlan109
network add address=10.166.109.0/24 dns-server=10.166.109.254 domain=aclab.uk gateway=10.166.109.254 netmask=24 ntp-server=10.166.109.254
/ip static dns
add address=10.166.109.1 comment="VMware OpenShift API" name=api.home-ocp01.aclab.uk type=A
add address=10.166.109.2 comment="VMware OpenShift API" match-subdomain=yes name=apps.home-ocp01.aclab.uk type=A
If you were doing this on a Microsoft DNS server, here are the commands.
Add-DnsServerResourceRecordA -Name api.home-ocp01 -ZoneName aclab.uk -IPv4Address 10.166.109.1
Add-DnsServerResourceRecordA -Name *.apps.home-ocp01 -ZoneName aclab.uk -IPv4Address 10.166.109.2
Add-DnsServerResourceRecordPtr -Name 1.109 -ZoneName 166.10.in-addr.arpa -PtrDomainName api.home-ocp01.aclab.uk
Caveats
There are some caveats to note when running OCP on VMs on vSphere. OpenShift has metadata inside of itself which references storage, hence if you do things yourself outside of OpenShift, like perform storage VMotion, it will likely break the link between the metadata and the VMDK where the persistent storage resides. This makes sense and is certainly worth committing to memory.
- Using Storage vMotion can cause issues and is not supported.
- If you are using VMware vSphere volumes in your pods, migrating a VM across datastores, either manually or through Storage vMotion, causes invalid references within OpenShift Container Platform persistent volume (PV) objects that can result in data loss.
- OpenShift Container Platform does not support selective migration of virtual machine disks (VMDKs) across data stores, using data store clusters for VM provisioning or for dynamic or static provisioning of PVs, or using a data store that is part of a data store cluster for dynamic or static provisioning of PVs.
Additionally, Red Hat does not support the following. This means you could, for example, perform the install on NSX-backed segments, and leverage the SDN of NSX; it would not be supported by Red Hat. Remember, OCP by default also does microsegmentation, so you need to plan this side carefully.
- Management: VCF Operations, VCF Automation, VCF Fleet Management, and VCF Identity Broker.
- Networking: VMware NSX Container Plugin (NCP).
- Migration: VMware HCX.
Cluster Creation
To keep things easy, I will run the initial setup commands from WSL on my Windows machine. We are using Fedora, as this is upstream Red Hat Enterprise Linux and will support all the required tooling. I run multiple WSL images; the last command will set Fedora as the default.
wsl.exe --list --online   # note down the latest Fedora image
wsl.exe --install FedoraLinux-43
wsl -s FedoraLinux-43
Now Fedora is up and running, we log in to the Red Hat Hybrid Cloud Console and create a new cluster, selecting Datacentre > vSphere.

You will then be presented with four pathways for installation. We will use Automated; however, here is a summary of all.
- Interactive – bootstraps the cluster via the cloud; you can download an ISO file to boot the nodes off.
- Local Agent – Based runs an assisted installer, which again you get from a downloaded ISO file.
- Automated – is what we are going to do, this is the IPI (Installer Provisioned Infrastructure) route.
- Full control – is the UPI (User Provisioned Infrastructure) route, which requires much more input but does give complete control for everything. If you’re installing OCP for the first time, this would be the hard path; you would get much closer to how things work.

From the IPI install screen, download the installer, the pull secret and the command line interface tools. Note that the pull secret is only valid for 24 hours; you will have to come back here and grab another if you wait that long to perform the install itself. As we’re installing on Fedora, I have selected RHEL9 for the CLI interface tool OS.

Perform the following commands from the WSL Fedora shell to prepare for the install.
cd Downloads
tar xvf openshift-install-linux.tar.gz
tar xvf openshift-client-linux-amd64-rhel9.tar.gz
rm openshift-install-linux.tar.gz openshift-client-linux-amd64-rhel9.tar.gz
sudo mv oc /usr/local/bin/
sudo mv kubectl /usr/local/bin/
ssh-keygen -t ed25519 -C home-ocp01
mkdir home-ocp01
wget https://raw.githubusercontent.com/amayacitta/ocp-lab/refs/heads/main/ipi-vsphere/install-config.yaml -O home-ocp01/install-config.yaml
Now that this is done, we need to ensure that Fedora trusts the vSphere certificate authority. From the main vCenter page, on the right, you can download the CA files.

Then run these commands to import it into Fedora as a trusted root certificate.
unzip download.zip
sudo cp certs/lin/* /usr/share/pki/ca-trust-source/anchors/
sudo update-ca-trust extract
Open the vSphere root CA and paste it into the relevant spot in the install-config.yaml file. This is already done in the GitHub pre-prepared file.

For the pull secret, you can simply copy and paste the output of the “pull-secret” file we downloaded earlier, or go back to the Red Hat Hybrid Cloud Console and copy the pull secret. If your browser closed, don’t worry, just run through the create cluster wizard again and copy a fresh one. The pull-secret is not tied to any individual cluster deployment.

Next, we need to validate the install-config.yaml file, make sure it’s in the home-ocp01 directory.
./openshift-install create install-config --dir home-ocp01
If you want to dig a little deeper, run the following command to produce the bare manifests for the cluster. When run the install-config.yaml file will be removed, so make sure you keep a copy elsewhere.
./openshift-install create manifests --dir home-ocp01
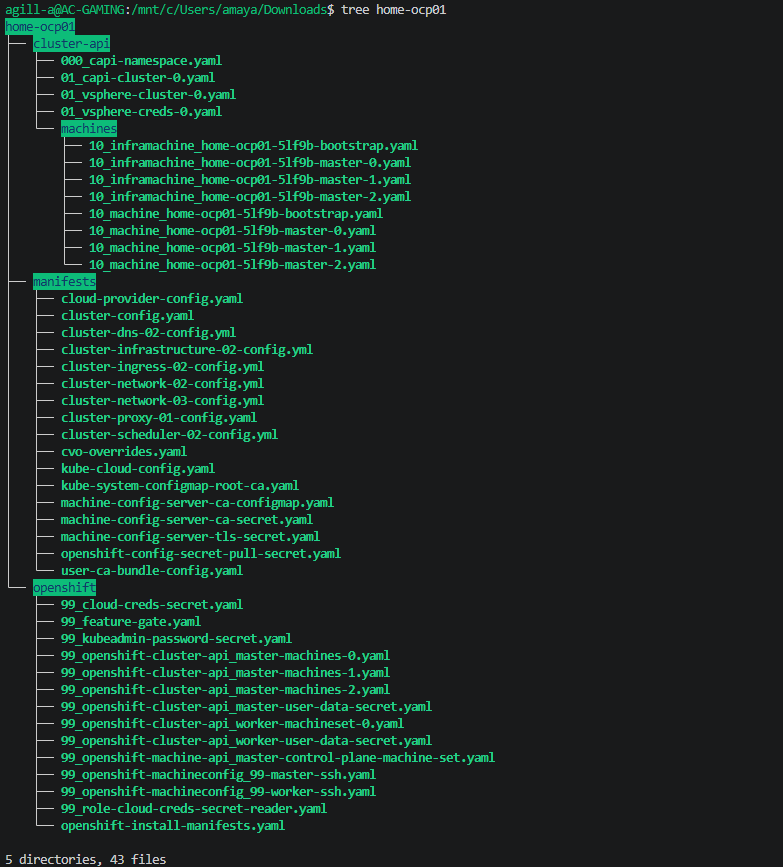
This creates the following file structure. The manifests can be modified as detailed here for advanced configurations.
Then install with the following command. As long as you have at a minimum the install-config.yaml, you can also skip the above steps entirely and just run the below.
./openshift-install create cluster --dir home-ocp01 --log-level=debugWhen creating the cluster, an OVA will be deployed as the node template.


Once the first virtual machine is deployed and marked as a template, the rest of the nodes will very quickly spawn.

The master node will attempt to connect to the API address on 10.166.109.1; you can see this from the console of the VM.

Looking at the Mikrotik router, I can see DHCP leases, so I know that side is good.

Keepalived will come up on the master nodes, which is how we will be able to reach the API.

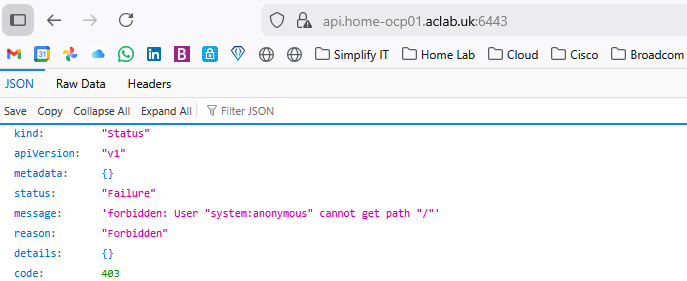
If you hit it with a default browser, you will see a page; we haven’t authenticated, so this error is expected. We are just confirming the plumbing whilst waiting.
If you open a second WSL console, you can use the static kubeconfig file to authenticate to the API and check progress. The cluster is trying to instantiate the container networking interface for the nodes to become ready. It does this via a cloud-controller-manager pod running in the openshift-cloud-controller-manager namespace.

After some time, it looks good, the CNI started ok.

You can review the logs for the OVN SDN in this namespace; if there was a problem here, the nodes would not become ready.

Once the masters are good, the workers will deploy.

They then join the cluster.

Check that the cluster operators are all fully finished. As you can see, some are not quite finished yet.

Eventually, everything looks good, the cluster console becomes active on https://console-openshift-console.apps.home-ocp01.aclab.uk.

The username will be kubeadmin, and grab the password from the static file generated by the installer.

Looking Deeper
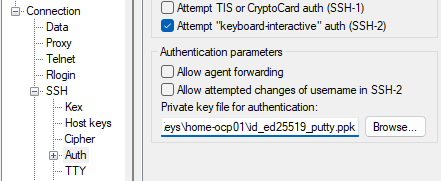
We can SSH directly to the master nodes using the SSH key we generated earlier, the one that was also placed in the install-config.yaml file. You will probably have to convert it to a v2 private key. To do that, load the private key in PuTTYgen and set key > parameters for saving key files > v2.

Log in as “core” with the private key set.

Then sudo -i as root.

From here, try the commands below for fun. There are plenty of other ways to run some of the below commands; using the localhost.kubeconfig from the master node, it can really help with debugging when there is an incident, as you’re directly on the node itself.
## look at logs
journalctl -f
journalctl -u kubelet -f

## look at containers through the container runtime
crictl ps
crictl logs <container id>
crictl pods

## get into oc using a static file
export KUBECONFIG=/etc/kubernetes/static-pod-resources/kube-apiserver-certs/secrets/node-kubeconfigs/localhost.kubeconfig

## check etcd
export ETCD_POD_NAME=$(oc get pods -n openshift-etcd -l app=etcd --field-selector="status.phase==Running" -o jsonpath="{.items[0].metadata.name}")
oc exec -n openshift-etcd -c etcdctl ${ETCD_POD_NAME} -- sh -c 'etcdctl endpoint status'
oc exec -n openshift-etcd -c etcdctl ${ETCD_POD_NAME} -- sh -c 'etcdctl endpoint health'
oc exec -n openshift-etcd -c etcdctl ${ETCD_POD_NAME} -- sh -c 'etcdctl member list -w table'
oc exec -n openshift-etcd -c etcdctl ${ETCD_POD_NAME} -- sh -c 'etcdctl endpoint health -w table'

## look at the ovs config
ovs-vsctl list-br
ovs-vsctl show
oc rsh -n openshift-ovn-kubernetes daemonset/ovnkube-node ovn-nbctl show
Destroy the cluster
When you’re done and want to destroy the cluster, you run the following command referencing the original directory which was used to install. This will fully tidy up, including deleting the tags, etc.
./openshift-install destroy bootstrap --dir home-ocp01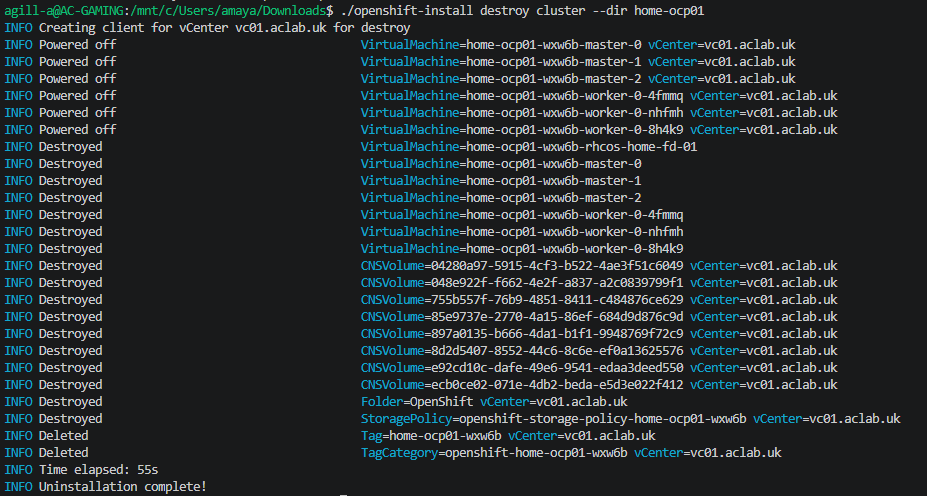
What’s Next?
At this point, we have a vanilla OCP cluster. What I’d like to do now is go through all the so called “Day-2” tasks to configure the cluster in a separate article. I’ll be configuring everything using ArgoCD or what is known as OpenShift GitOps. This is a CI/CD tool which is also used for VMware Tanzu and is very popular amongst the community.
The principle is that the code repository on GitHub is the ultimate source of truth from this point on. Nothing will be deployed manually or tinkered with. This means that everything is coded, version-controlled and repeatable. If we redeployed, we would just re-attach ArgoCD to the repo, and it would take the cluster to where it was before.
This principle is brilliant, it’s a self-documenting system, not without its faults, of course. The branch to which Argo talks must be protected at all costs. If there aren’t sufficient security controls in place to protect it, then someone could, by mistake, just like they can create the cluster, destroy it entirely – and very quickly at that.