This article will run through a VCF 9.1 build with 2 x Minis forum MS-A2 nodes; the spec is laid out here. I’m going to focus on the differences found so far from the prior 9.0.2 single-node build I wrote about back in February. I’ll then go over some new feature sets and functionality discovered to date.
Navigation
- References
- ESX Build
- Offline Depot
- VCF Installer
- Fix NVMe Tiering
- License Server
- VCF Management Platform
- VCF Automation Platform
- Initial Discoveries
- What’s next
References
I’ll start with a bullet list of references, mainly as I always recommend digesting documentation where possible. This is something I skipped for NVMe tiering and ended up getting myself stuck! I highly recommend reading the links below. There are some substantial changes to licensing and fleet management, which I will unpack as we go.
- Broadcom – What’s new VCF 9.1
- Broadcom – VCF Components FQDNs and IP addresses
- Broadcom – Use a JSON spec file to deploy VCF
- Broadcom – Setup offline depot for 9.1
- William Lam – Comprehensive ESX 9.1 workarounds for lab deployments
ESX Build
The build is almost identical apart from two changes; the updated kickstart files are here on GitHub. NVMe tiering enablement has a new command, and I’ve added some tweaks for the notoriously dodgy Intel X710 NICs in the MS-A2 nodes. Everything else remains the same.
# Enable & Configure NVMe Tiering
# Check with the below commands
# esxcli memtier status get
# esxcli system tierdevice list
# esxcli system settings advanced list -o /Mem/TierNvmePct
# memstats -r vmtier-stats -u mb -s name:memSize:active:tier1Target:tier1Consumed:tier1ConsumedPeak:comsumed
esxcli system settings kernel set -s MemoryTiering -v TRUE
esxcli system settings advanced set -o /Mem/TierNvmePct -i 100
esxcli system tierdevice create -d /vmfs/devices/disks/${nvme_tiering_device}
esxcli memtier enable -d /vmfs/devices/disks/${nvme_tiering_device}
## Fix some performance issues with intel X710 hardware offload
esxcli system settings advanced set -o /Net/TcpipDefLROEnabled -i 0
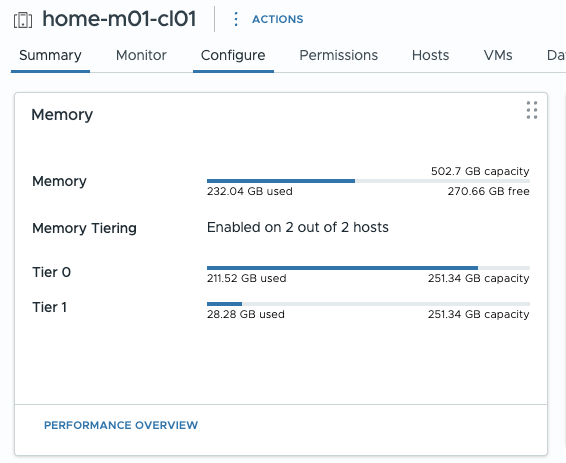
esxcli system settings advanced set -o /Net/UseHwTSO -i 0One super handy change is that it’s now super easy to report on NVMe tiering stats. For example, the cluster summary page has a handy graphic showing Tier 0 (DRAM) and Tier 1 (NVMe) memory usage.
Offline Depot
For the 9.1 install, I am using a Photon OS offline depot to perform the install. I’ve already written an article about this.
One big difference is the removal of the usual download token, which is now replaced by a pairing of a depot ID and activation code. You generate a Deport ID using the new VCF download tool, which is used to generate an activation code within the VCF business console.
The other difference is the layout of the commands to use the tool and set up the ESX patch store.
Head over to my How to build a VCF 9.1 Offline Depot article for more information.
VCF Installer
Following on from the offline depot, as with 9.0.2, you deploy an OVA VCF installer, which, if deployed onto one of the ESX hosts which is a part of the environment, can be converted to the SDDC manager appliance. Although the SDDC manager is on the road map for depreciation, it’s still around. Although more features are present in VCF Operations, for example, deploying an AVI control plane.
OVA Deployment
You can rapidly deploy this using ovftool with the following commands.
## review properties within ova file
ovftool VCF-SDDC-Manager-Appliance-9.1.0.0.25371088.ova

## store password as variable securely
read -s password

## deploy sddc installer
ovftool --name=sddcm01 \
--X:injectOvfEnv --acceptAllEulas --noSSLVerify \
--net:"Network 1"="VM Network" \
-ds=local-esx01 --powerOn -dm=thin \
--prop:ROOT_PASSWORD="$password" \
--prop:LOCAL_USER_PASSWORD="$password" \
--prop:vami.hostname="sddcm01.aclab.uk" \
--prop:guestinfo.ntp="10.166.101.254" \
--prop:vami.ip0.SDDC-Manager="10.166.101.10" \
--prop:vami.netmask0.SDDC-Manager="255.255.255.0" \
--prop:vami.gateway.SDDC-Manager="10.166.101.254" \
--prop:vami.domain.SDDC-Manager="aclab.uk" \
--prop:vami.searchpath.SDDC-Manager="aclab.uk" \
--prop:vami.DNS.SDDC-Manager="10.166.101.254" \
VCF-SDDC-Manager-Appliance-9.1.0.0.25371088.ova vi://root:$password@esx01.aclab.uk
SDDC Installer Tweaks
Once the SDDC installer/manager is deployed, the following tweaks are needed. They allow for a single host deployment and for the non-certified NVMe drivers to be claimed for vSAN ESA.
su
echo "vsan.esa.sddc.managed.disk.claim=true" >> /etc/vmware/vcf/domainmanager/application-prod.properties
echo "feature.vcf.vgl-29121.single.host.domain=true" >> /home/vcf/feature.properties
echo 'y' | /opt/vmware/vcf/operationsmanager/scripts/cli/sddcmanager_restart_services.sh
Certificate Trust
We can then perform the steps to trust the certificate added to the offline depot.
## upload lab root certs from my machine
scp RootCA.pem vcf@sddcm01.aclab.uk:/home/vcf
scp Sub01.pem vcf@sddcm01.aclab.uk:/home/vcf

## as per below also add to java key store
## https://knowledge.broadcom.com/external/article/316056/how-to-adddelete-custom-ca-certificates.html
## grab password
cat /etc/vmware/vcf/commonsvcs/trusted_certificates.key

## import roots into java key stores
keytool -importcert -alias rootca -file /home/vcf/RootCA.pem -keystore /etc/vmware/vcf/commonsvcs/trusted_certificates.store --storepass 'pass from prior command'
keytool -importcert -alias sub01 -file /home/vcf/Sub01.pem -keystore /etc/vmware/vcf/commonsvcs/trusted_certificates.store --storepass 'pass from prior command'

## for this one the password is literally changeit
keytool -importcert -alias rootca -file /home/vcf/RootCA.pem -keystore /etc/alternatives/jre/lib/security/cacerts --storepass 'changeit'
keytool -importcert -alias sub01 -file /home/vcf/Sub01.pem -keystore /etc/alternatives/jre/lib/security/cacerts --storepass 'changeit
At this point, we can point the SDDC installer at the offline depot URL. Nothing is different here from 9.0.2, the 9.1 offline depot guide goes into the exact steps if you’re not sure what to do here.
One thing I’ve noticed so far about 9.1 is that you cannot have any other VM’s other than the SDDC installer in the default VM Network port group. Once the depot binaries are downloaded to the installer, shut the offline depot VM down and unregister it from the ESX host. You can add it back in when the VCF deployment completes.
Deploy VCF using JSON
The JSON file now has additional areas which are required, mainly because there is now a VCF Management Platform deployed as a Kubernetes cluster, with platform components inside. These replace the Fleet Management appliance that was present in the prior version.
There is a new planning workbook for 9.1 here; however, I haven’t yet filled it in for the two-node deployment. The new JSON file is available on GitHub here; make sure you update the password in the various places throughout the file, search for “changeme” to find each place.
The SDDC installer has a far more intuitive interface, which allows you to filter tasks much more easily. It also has a nice left-to-right graphic showing you the deployment of each stage.

I was quite surprised that it took from 5/05/2026, 21:39 to 16/05/2026, 03:56 to fully deploy. However, at the time, I hadn’t worked out how to fix the NVMe memory tiering enablement. So my nodes were heavily constrained, slowing everything down.
Fix NVMe Tiering
As mentioned in the kickstart file, the fix for NVMe memory tiering was to place each node in Maintenance mode and run the following command.
nvme_tiering_device="t10.NVMe____Samsung_SSD_990_EVO_Plus_1TB____________EEF2A35159382500"
esxcli memtier enable -d /vmfs/devices/disks/${nvme_tiering_device}
As soon as this was done, my nodes reported additional memory, and things looked much happier! That said, for this small non-HA deployment, the VCF-A platform appliance wants to consume the entire MS-A2 node.

I turned off VCF-A and will explain why later. This is what a default small non-HA setup looks like.

License Server
As you can probably spot above, there is a new Licence Server VM. This operates without any connectivity to the internet and plugs into the various components internally, i.e. vCenter, VCF Operations, etc. You still license the product through VCF Operations, however the license server records licensed assets.
Although the license server can be offline, it will impact assigning any new licences, i.e. deploying a new workload domain with a new vCenter server or adding new hosts to an existing vCenter server.
If you lose the license server, it cannot be restored from a backup. You need to deploy a fresh one and register it with the VCF business services console through VCF operations.
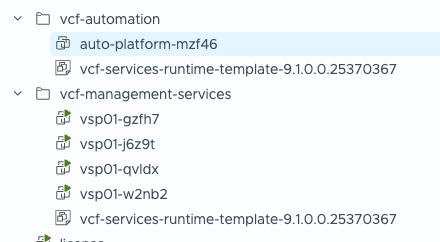
VCF Management Platform
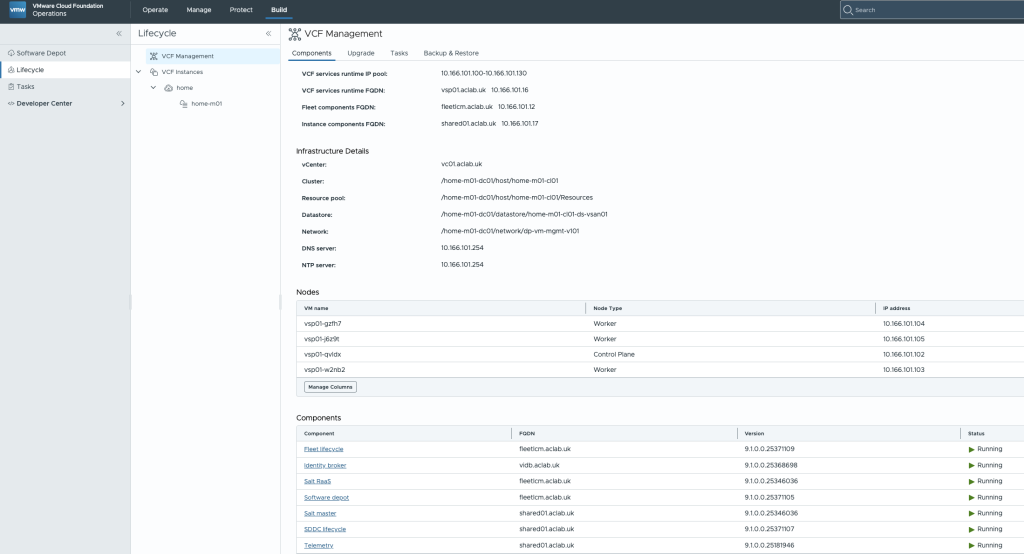
With the small non-HA deployment, we have a single control plane node and three worker nodes formed as a Kubernetes platform. These are not linked to a Supervisor cluster or VKS cluster; they are automatically deployed from a VM template as part of the stand-up.
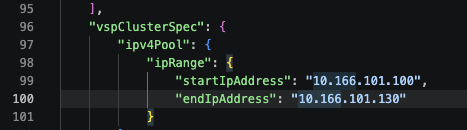
Inside the JSON file, there is a vspClusterSpec which relates, out of this pool of a maximum of 30 addresses, nodes are assigned various addresses. In my setup, the second IP address is the control plane node, i.e. 10.166.101.101.
If you SSH to one of the nodes you can run the following commands to look deeper into the Kubernetes cluster.
## sudo to be able to read the super-admin kubeconfig file
sudo su

## change the KUBECONFIG variable and add an alias
export KUBECONFIG=/etc/kubernetes/super-admin.conf
alias k=kubectl

## do a quick cluster check
k cluster-info
k get nodes -o wide
As you can see, we have a single control plane and three workers. The specifications of these VM’s are as follows. This is a lot for a small setup.
| Node Type | Memory | vCPU |
| Control Plane Node | 24 | 12 |
| Worker Node 01 | 24 | 12 |
| Worker Node 02 | 24 | 12 |
| Worker Node 03 | 24 | 12 |
| TOTAL | 96 | 48 |
Inside the Kubernetes cluster, there are a total of 176 pods. The default CNI is Antrea, with the usual CoreDNS, etcd, Kube-proxy etc. Storage for Kubernetes is provided by the usual vSphere CSI, which has a fair number of PVC’s configured, which you can see from vSphere or Kubectl.


There is kube-prom-stack operator, cert-manager, fluentbit logging, Kyvenro and many other platform components. Default VCF management components inside the K8 cluster consist of:
- Fleet Lifecyle
- Identity Broker
- Salt RaaS
- Software deport
- Salt master
- SDDC lifecycle
- Telemetry
These can all be viewed from VCF Operations. An additional real-time metrics component can optionally be deployed as outlined here.
VCF Automation Platform
There is also a VCF-A VM deployed as a single-node Kubernetes cluster. As with VCF management services, the cluster is created using a VCF Services Runtime VM template.
The resource requirements are 24 cores and 96GB RAM out of the box. Even with my AMD Ryzen 9 9955HX and 256GB RAM on a dedicated MS-A2 node, I cannot get the services to work. The ESX node CPU maxes out, and web and SSH connect but throw a load of timeout errors. I’ll continue to debug this when I find time and will report back if I get it working.
For now, I have a larger lab at work, where I figured out how to get in. It’s very similar to the VCF Management cluster.
## sudo to be able to read the admin kubeconfig file
sudo su

## change the KUBECONFIG variable and add an alias
export KUBECONFIG=/etc/kubernetes/admin.conf
alias k=kubectl

## do a quick cluster check
k get nodes -o wide
As you can see there are only control plane nodes, however they are 96GB and 24 cores each. As with the VCF management cluster, the usual platform components are there. Antrea for CNI, vSphere CSI, Core DNS, Kyverno, Fluentbit, Envoy proxy, Kube-prom stack etc.

In total there are 317 pods, so its far more chunky than the management platform.
Initial Discoveries
Without trawling through the release notes and what’s new documents, here are some things I’ve found that are new to date.
You can now take a VM and migrate it into the Supervisor management plane. Did that exist in 9.0.2?

Spans now exist to limit VPC networks to specific vSphere clusters.

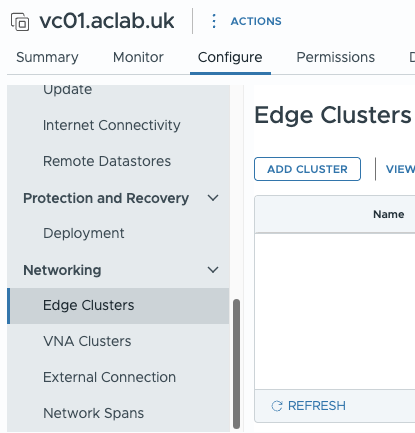
There is a new area under the Virtual Centre server > Configure to deploy Edge clusters, VNA clusters, External connections and Network Spans. VNA clusters are new and bring stateful services to distributed connectivity.
You can centrally manage the desired state from the cluster object. This centralises configuration and reports configuration drift. For NVMe memory tiering, it will qualify hardware, so it’s incompatible with my lab. To work around this, I configured NVMe Memory Tiering on the host individually.

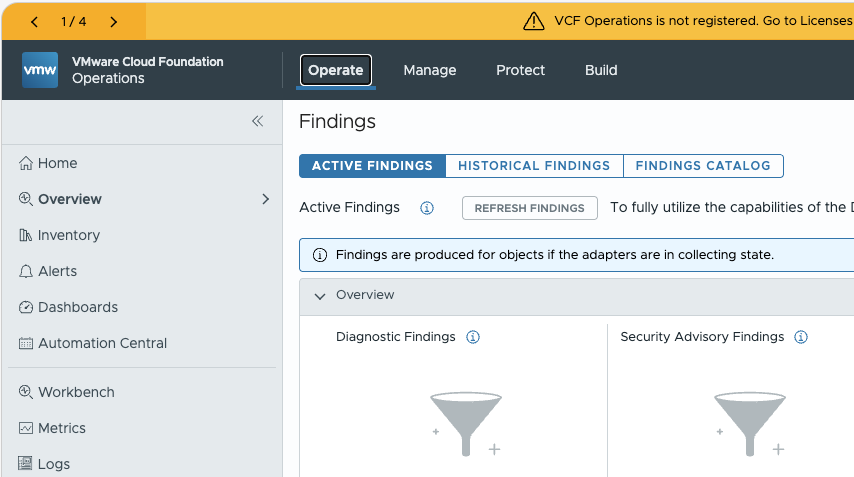
The VCF Operations menu has been nicely restructured.
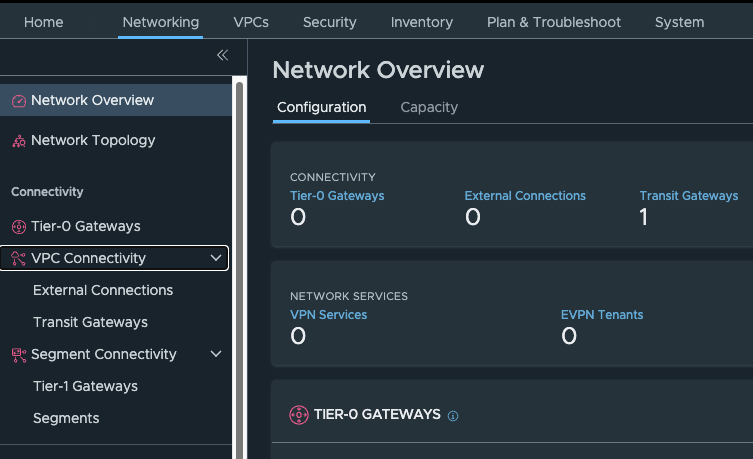
The NSX menu system has also had a nice change, seperating out VPC and Segment networking.
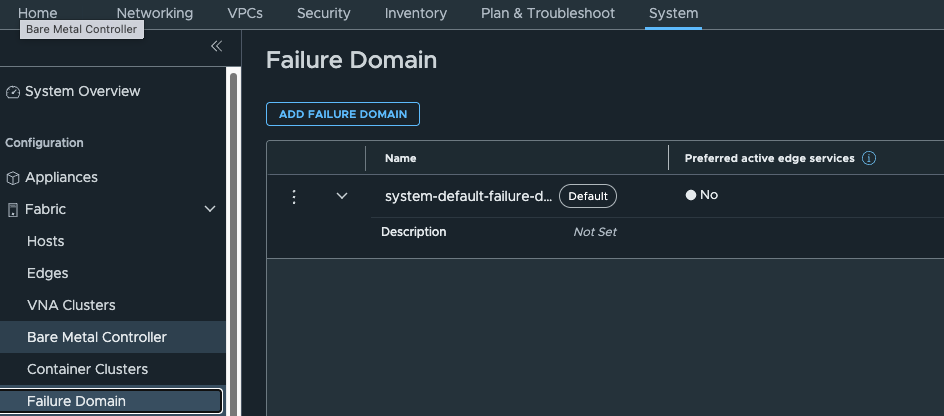
Edge failure domains are shown in the GUI.
EVPN route controller and Distributed VXLAN connections make it possible to advertise EVPN routes between NSX and the external fabric. This will allow transport nodes to have direct VXLAN connectivity to hardware VTEPS in, for example, an NXOS fabric. This is something I will be playing with very soon, as it would allow connectivity to bypass the NSX edge nodes.

What’s next
I’ll begin exploring further 9.1 functionality and will be sure to write some articles on the differences. I think, in the main, the Supervisor and VKS versions are the same, as these are known to be async releases from the 9.1 release cycle. For example, AVI 32.1.1 is now supported, and I hear that AKO is deployed automatically into VKS clusters. I definitely want to give that a bash.