
This article will explain the steps required to build an offline depot for VCF 9.1 on Photon OS. The new version has some significant changes to be able to access the download binaries. In prior versions, a download token was generally available for use against any depot server. In 9.1, there is a software depot ID which you associate with the VCF business console to generate an activation code. This stops the abuse of download tokens and means each VCF installer or instance of an offline depot will require its own activation code. The full process is documented here.
Navigation
- Downloads
- Create DNS records
- Deploy Virtual Machine
- Photon OS and Apache Setup
- VCF Download Tool
- Configure SDDC Installer for new install
- Configure VCF Ops for existing install
- Scheduled Patch Store Updates
- What’s Next
Downloads
Head over to the Broadcom support site for VCF, under drivers and tools, grab the VCF download tool. Then head on over to the VMware Photon OS download site and grab the full ISO image for Photon 5. In my case, I already have an offline depot for version 9.0.2 and will be upgrading the tool and grabbing the latest binaries.
Create DNS records
I’ll be using the same DNS record that is already added to my MikroTik router for the new depot VM. This creates forward and reverse records.
/ip dns static
add address=10.166.101.1 comment="VCF Depot" name=depot01.aclab.uk type=A
Deploy Virtual Machine
The Virtual Machine and OS deployment is the same as in 9.0.2, please read the prior article for detailed steps.
Photon OS and Apache Setup
From the initial boot, you will be unable to SSH remotely, log in via the console from ESX and run the following commands. I recommend using a temporary basic password, as doing it via the VMware console is a pain.
useradd vcf -d /home/vcf -m
passwd -x 99999 vcf
passwd vcf
echo "vcf  ALL=(ALL)  NOPASSWD: ALL" >> /etc/sudoers.d/vcf
Once done, you will be able to SSH to the depot01 VM with vcf@depot01.aclab.uk and the temporary password. At this point, you can complete the setup with the following commands, which are much easier to paste over SSH.
The below commands complete the Apache setup, commands later in this article explain the VCF binary downloads.
## set secure password
passwd

## upload root certs, apache cert and download tool from my local machine
scp RootCA.pem vcf@depot01.aclab.uk:/home/vcf
scp Sub01.pem vcf@depot01.aclab.uk:/home/vcf
scp aclabuk_wildcard_microsoft_issued_public.pem vcf@depot01.aclab.uk:/home/vcf
scp aclabuk_wildcard_microsoft_issued_private.pem vcf@depot01.aclab.uk:/home/vcf
scp vcf-download-tool-9.1.0.0.25371089.tar.gz vcf@depot01.aclab.uk:/home/vcf

## setup public key auth for vcf user, replace the public key with your own
mkdir /home/vcf/.ssh -p
chmod 700 /home/vcf/.ssh
echo "ssh-ed25519 AAAAC3NzaC1lZDI1NTE5AAAAINHl20St5gyzVw/NXHpNcS8nUXwgrYHIvP/+f3ijtGAw" > /home/vcf/.ssh/authorized_keys
chmod 600 /home/vcf/.ssh/authorized_keys
sudo chown vcf:root /home/vcf -R

## secure sshd so only public key auth is possible
sudo su
cp /etc/ssh/sshd_config /etc/ssh/sshd_config.bak
sed -i 's/#PasswordAuthentication yes/PasswordAuthentication no/' /etc/ssh/sshd_config
echo "AuthenticationMethods publickey" >> /etc/ssh/sshd_config
systemctl daemon-reload
systemctl restart sshd

## if there are issues with openssl versions mismatches do the below
## look at "journalctl -f" when connecting via ssh
tdnf install openssh
systemctl daemon-reload
systemctl start sshd

## install packages, configure certificate trust
tdnf install httpd tar jq perl tree openssl-c_rehash vim --assumeyes
tdnf update --assumeyes
cd /home/vcf
cp RootCA.pem /etc/ssl/certs/
cp Sub01.pem /etc/ssl/certs/
rehash_ca_certificates.sh

## setup tls certs for apache
cp aclabuk_wildcard_microsoft_issued_public.pem /etc/httpd/conf/server.crt
cp aclabuk_wildcard_microsoft_issued_private.pem /etc/httpd/conf/server.key
chmod 0400 /etc/httpd/conf/server.key /etc/httpd/conf/server.crt
chown root:root /etc/httpd/conf/server.key /etc/httpd/conf/server.crt

## add htaccess password for vcf user for use with the COMP directory
htpasswd -c /etc/httpd/conf/.htpasswd vcf
chown apache /etc/httpd/conf/.htpasswd
chmod 0400 /etc/httpd/conf/.htpasswd

## backup and replace the apache configuration files with the ones provided in my github
## modify line 158 in httpd-ssl.conf to include your own hostname as required
cd /home/vcf
cp /etc/httpd/conf/httpd.conf /etc/httpd/conf/httpd.conf.bak
cp /etc/httpd/conf/extra/httpd-ssl.conf /etc/httpd/conf/extra/httpd-ssl.conf.bak
curl https://raw.githubusercontent.com/amayacitta/vcf9-lab/refs/heads/main/depot/httpd.conf -o /etc/httpd/conf/httpd.conf
curl https://raw.githubusercontent.com/amayacitta/vcf9-lab/refs/heads/main/depot/httpd-ssl.conf -o /etc/httpd/conf/extra/httpd-ssl.conf

## create dir and sort permissions
mkdir /var/www/html -p
chown apache:apache -R /var/www/html/
find /var/www/html -type d -exec chmod 0500 {} \;
find /var/www/html -type f -exec chmod 0400 {} \;
chmod 755 /var/www/
chmod 755 /var/www/html/

## validate apache config and start the service
httpd -t
systemctl enable httpd
systemctl start httpd
systemctl status httpd

## configure firewall to allow https
cp /etc/systemd/scripts/ip4save /etc/systemd/scripts/ip4save.bak
sed -i 's/COMMIT/-A INPUT -p tcp -m tcp --dport 443 -j ACCEPT/' /etc/systemd/scripts/ip4save
echo "COMMIT" >> /etc/systemd/scripts/ip4save
systemctl restart iptables
VCF Download Tool
The commands below configure the VCF download tool and grab the binaries, as well as set up the ESX patch store. In the prior 9.0.2 version, there was a UMDS service setup command which needed to be ran. With 9.1, the UMDS service is pre-installed onto the SDDC manager and is already pointing at the Fleet Lifecycle Manager URL. You can see this with the below command whilst logged into the SDDC manager.
/opt/vmware/vmware-umds/bin/vmware-umds run -G
For 9.1 we only need to run the below commands, the UMDS patch download is a new command which points at the same /var/www/html directory. This automatically creates the following symbolic link in the file system.

## tidy up the prior 9.0.2 install
rm vcf-download-tool

## install the download tool and generate a depot id
## follow the instructions shown in the shell to generate an activation code
mkdir vcf-download-tool
tar -xvf vcf-download-tool-9.1.0.0.25371089.tar.gz -C vcf-download-tool
cd vcf-download-tool/bin
./vcf-download-tool configuration generate --software-depot-id

## create file with the activation code generated in the vcf business console
echo "your broadcom activation code" > /home/vcf/activation-code.txt

## filter and confirm the esx patch store will only download 9.1
./vcf-download-tool esx configuration -D=embeddedEsx-6.7-INTL
./vcf-download-tool esx configuration -D=embeddedEsx-8.0-INTL
./vcf-download-tool esx configuration -D=embeddedEsx-7.0-INTL
./vcf-download-tool esx configuration -D=embeddedEsx-9.0-INTL
./vcf-download-tool esx configuration -D=esxio-8.0-INTL
./vcf-download-tool esx configuration -D=esxio-9.0-INTL
./vcf-download-tool esx configuration -G

## download the esx patch store filtered to only 9.1
./vcf-download-tool esx download --depot-download-activation-code-file /home/vcf/activation-code.txt --depot-store /var/www/html

## download all installation binaries
./vcf-download-tool binaries download --sku VCF --vcf-version 9.1 --depot-download-activation-code-file /home/vcf/activation-code.txt --type INSTALL --depot-store /var/www/html

## download all upgrade binaries (if needed)
./vcf-download-tool binaries download --sku VCF --vcf-version 9.1 --depot-download-activation-code-file /home/vcf/activation-code.txt --type UPGRADE --depot-store /var/www/html

## when running these commands as root perform the following to fix permissions
chown apache:apache -R /var/www/html/
find /var/www/html -type d -exec chmod 0500 {} \;
find /var/www/html -type f -exec chmod 0400 {} \;
chmod 755 /var/www/
chmod 755 /var/www/html/
The patch downloads will take a while. When complete, you will see a summary.

The installer binaries will also show a summary.

The upgrade binaries will also show a summary.

We can also now test this in our browser. Hitting the root of the web server will show this.

If we go to /PROD/COMP or /PROD/metadata, we should be prompted for a username and password. This is the VCF user and password we configured above with htpasswd.
Once we enter the correct credentials, we can see the directory contents.


Configure SDDC Installer for new install
The next part of this guide assumes you have already deployed the SDDC installer appliance. If you want to deploy it quickly as part of a vanilla stand-up, ovf-tool is your friend. Just remember to be specific with the information you pass, the principal is to use “–prop:{ClassID}.{Key}.{InstanceID}={Value}”. If there is no class or Instance ID, omit that part of the properties string.
## review properties within ova file
ovftool VCF-SDDC-Manager-Appliance-9.1.0.0.25371088.ova

## store password as variable securely
read -s password

## deploy sddc installer
ovftool --name=sddcm01 \
--X:injectOvfEnv --acceptAllEulas --noSSLVerify \
--net:"Network 1"="VM Network" \
-ds=local-esx01 --powerOn -dm=thin \
--prop:ROOT_PASSWORD="$password" \
--prop:LOCAL_USER_PASSWORD="$password" \
--prop:vami.hostname="sddcm01.aclab.uk" \
--prop:guestinfo.ntp="10.166.101.254" \
--prop:vami.ip0.SDDC-Manager="10.166.101.10" \
--prop:vami.netmask0.SDDC-Manager="255.255.255.0" \
--prop:vami.gateway.SDDC-Manager="10.166.101.254" \
--prop:vami.domain.SDDC-Manager="aclab.uk" \
--prop:vami.searchpath.SDDC-Manager="aclab.uk" \
--prop:vami.DNS.SDDC-Manager="10.166.101.254" \
VCF-SDDC-Manager-Appliance-9.1.0.0.25371088.ova vi://root:$password@esx01.aclab.uk
Once the SDDC installer/manager is deployed, the below tweaks are needed. They allow for a single or dual host deployment and for the non-certified NVMe drivers to be claimed for vSAN ESA.
su
echo "vsan.esa.sddc.managed.disk.claim=true" >> /etc/vmware/vcf/domainmanager/application-prod.properties
echo "feature.vcf.vgl-29121.single.host.domain=true" >> /home/vcf/feature.properties
echo 'y' | /opt/vmware/vcf/operationsmanager/scripts/cli/sddcmanager_restart_services.sh
We can then perform the steps to trust the certificate added to the offline depot.
## upload root certs from my machine
scp RootCA.pem vcf@sddcm01.aclab.uk:/home/vcf
scp Sub01.pem vcf@sddcm01.aclab.uk:/home/vcf

## as per below also add to java key store
## https://knowledge.broadcom.com/external/article/316056/how-to-adddelete-custom-ca-certificates.html
## grab password
cat /etc/vmware/vcf/commonsvcs/trusted_certificates.key

## import roots into java key stores
keytool -importcert -alias rootca -file /home/vcf/RootCA.pem -keystore /etc/vmware/vcf/commonsvcs/trusted_certificates.store --storepass 'pass from prior command'
keytool -importcert -alias sub01 -file /home/vcf/Sub01.pem -keystore /etc/vmware/vcf/commonsvcs/trusted_certificates.store --storepass 'pass from prior command'

## for this one the password is literally changeit
keytool -importcert -alias rootca -file /home/vcf/RootCA.pem -keystore /etc/alternatives/jre/lib/security/cacerts --storepass 'changeit'
keytool -importcert -alias sub01 -file /home/vcf/Sub01.pem -keystore /etc/alternatives/jre/lib/security/cacerts --storepass 'changeit'
At this point, we can point the SDDC installer at the offline depot URL. From the main page, click depot settings and binary management.

Click configure on offline depot and enter the details, click configure.

After a few seconds, the depot will become active.

Click download against the VCF 9.1.0.0 binaries, to download them from the offline depot over the local network. You can now continue with a normal install, or upgrade depending on what you need to do next.
One thing I’ve noticed so far about 9.1 is that you cannot have any other VM’s other than the SDDC installer in the default VM Network port group. Once the depot binaries are downloaded to the installer, shut the offline depot VM down and unregister it from the ESX host. You can add it back in when the VCF deployment completes.

Configure VCF Ops for existing install
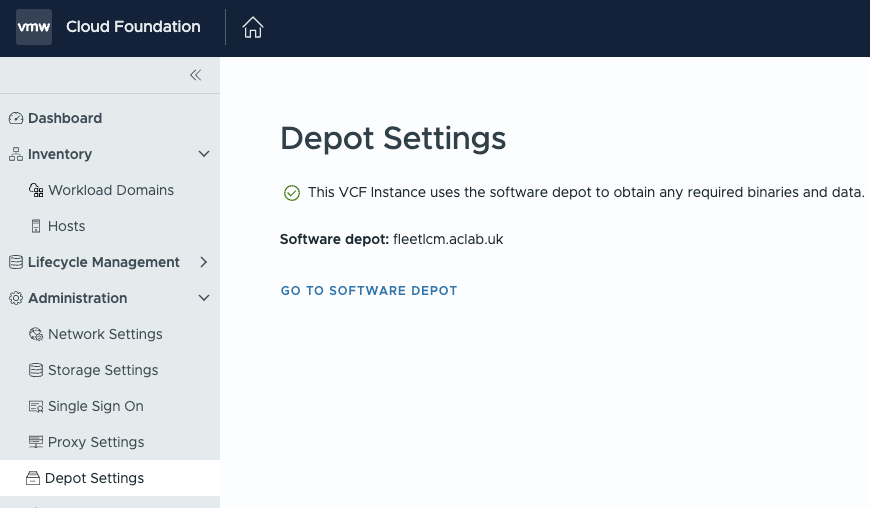
With 9.1, there is only one place to configure the offline depot; this is done within Build > Software Depot. Click the edit button and select offline depot.

Enter the details, click validate and your done.

This automatically configures the VCF instance, which now can no longer be individually configured.

Ditto for the SDDC manager.
From Build > Lifecycle > VCF Instances > home > click the lifecycle metadata sync on the right and the ESX component sync and ensure both work without error.

From build > tasks you can see the status of the command.

Scheduled Patch Store Updates
By default, there is no scheduling mechanism within the patch store service. The ESX patch store doesn’t get deployed as a systemd service or cron job. To allow nightly updates, perform the following. By default, the daily jobs run at 04:02 every day.
## deploy cron
tdnf update --assumeyes
tdnf install cronie --assumeyes

## create crontab file
cat <<EOF > /etc/cron.daily/umds.sh
# Download ESX patch binaries and metadata
/home/vcf/vcf-download-tool/bin/vcf-download-tool esx download --depot-download-activation-code-file /home/vcf/activation-code.txt --depot-store /var/www/html

# As these are downloaded with root change we will secure the permissions
chown apache:apache -R /var/www/html/
find /var/www/html -type d -exec chmod 0500 {} \;
find /var/www/html -type f -exec chmod 0400 {} \;
chmod 755 /var/www/
chmod 755 /var/www/html/
EOF
chmod +x /etc/cron.daily/umds.sh
What’s Next
This concludes the setup of the offline depot. As I continue to explore the new features within 9.1, I’ll be sure to write new, updated articles. There is much to explore!