
Ok, so nothing is perfect, right? I tend to think one of the best qualities in human beings is to appreciate imperfection. For technology, we need standards and so-called “best practices” so that things are coherent and function well with PKI, especially. Over multiple decades, deploying Microsoft public key infrastructure into organisations of various sizes, I have seen much client variation and have worked to bring platforms to a standard, so they are well understood and can be more easily administered.
Four Part Series
This article is part of a four-part series.
- Part #1 – Deploying and Understanding PKI
- Part #2 – How to safely renew root certificates
- Part #3 – How to upgrade the CA Operating Systems
- Part #4 – How to replace an existing PKI hierarchy
Navigation
- Four Part Series
- Intro and Concepts
- Example Deployment Summary
- Server Deployment
- Certificate Services Deployment Defaults
- DNS Records
- HA Proxy Load Balancing
- OU and GPO Preparation
- Deploy and Configure the Offline Root CA Roles
- Deploy and Configure the Issuing Subordinate CA Roles
- Publish Certificate Templates
- Site Awareness
- What’s Next
Intro and Concepts
This article exists to bring together learnings on the path and help others demystify PKI. In my experience, customers have consistently been afraid of their environments, even when well considered and designed. Especially when it comes to subjects such as renewals, upgrades or migrations to newer variants of the Windows operating system. I’ll offer my perspective on how best to tackle these areas in other articles, first to begin, we need to understand some basic concepts and deploy a base system to get to grips with it.
The concept of PKI tiering exists in almost all public certificate authorities. If you look at any certificate, for example, the one for this very blog, you will see a hierarchy of trust. At the top of the tree is a root certificate, beneath that is a subordinate certificate, and beneath that is the wildcard for this blog. The wildcard is issued by the subordinate, and the intermediate is issued by the root. This forms a chain of trust, from the server cert > intermediate > root.

Your operating system will have baked into it a set of root and subordinate certificates which automatically trust particular certificates and not others. On Windows, if you run certlm.msc, you will see the trusted roots and below that intermediate certificates.

On Linux, it depends on the distribution however, most have a path to which you place a PEM-formatted public certificate, and then these get flattened into a special ca-bundle.crt file, which is the trusted certificate store itself. It’s usually stored in /etc/pki/tls/certs/ca-bundle.crt. For example, on Red Hat, you place a PEM file inside /usr/share/pki/ca-trust-source/anchors/ and then update the ca-trust file using update-ca-trust.
cp ~/root-public-example.pem /usr/share/pki/ca-trust-source/anchors/
update-ca-trust extract
For Photon OS, you place the PEM file in /etc/ssl/certs/ and run a rehash command, which you may need to install.
cp ~/root-public-example.pem /etc/ssl/certs/
tdnf install -y openssl-c_rehash
rehash_ca_certificates.sh
For Debian / Ubuntu, you place the PEM file in /usr/local/share/ca-certificates/ with a crt extension and run an update-ca-certificate command.
cp ~/root-public-example.pem /usr/local/share/ca-certificates/root-public-example.crt
update-ca-certificate
When deploying an internal PKI hierarchy for an organisation, big or small the usual recommendation is to deploy at minimum a “Two-Tier PKI” this means you follow the same standards that the big public authorities do, i.e. you deploy a Root certificate authority (CA) and from there deploy and issue one or more Subordinate CA. The Subordinates are often called issuing servers, as they are where you issue the certificates to your internal systems (laptops, users, servers, applications, etc.). The root only issues subordinate certificates.
For reasons of better security, the Root CA is usually not domain-joined, it is “standalone” and is turned off most of the time, unless there is some maintenance to perform. Being offline most of the time helps protect the private key, which is used to generate certificates. A thing to note is that if you obtained a copy of said private key, you could generate infinite certificates impersonating the organisation that owns the CA. If you think that through, this means you could pretend to be the owner, manipulating the chain of trust, which is a springboard to further vulnerability, breaking open what is otherwise a mechanism to keep a business’s data encrypted and safe.
The issuing subordinate CA is issued off the Root CA (whilst it is online) and is usually domain joined and tapped into your Active Directory. A subordinate of this type is called an “Enterprise CA” and, from an Active Directory point of view, is a forest-wide role. Within Active Directory, there are a bunch of certificate templates which control who/what/where certificates are issued. Said templates are forest-wide and can potentially apply to all subordinate CA servers, no matter if they are in a parent or a given child domain within the forest.
Some organisations will want multiple subordinate CA servers, for matters of resilience or segregation of responsibilities. By default, when a CA template is published to two enterprise issuing CA servers, clients (with the right permissions) who desire a template will, in effect, “round robin” between those servers, unless site awareness is configured, in which case clients will go to their local AD site for issuing templates. Administrators can constrain what templates are issued by publishing or unpublishing them from particular CA servers. In my experience, most organisations publish the same templates on all servers and enable site awareness at a minimum. Which is what we shall do in this article. To do this, you obviously need more than one AD site.
There are some further concepts to get your head around before we continue to deployment. These are AIA, CDP and OCSP.
Authority Information Access (AIA) is an extension that specifies a URL where the issuing CA certificate can be obtained. If a client is unable to build a complete certificate trust chain using the certificates in its own trust store, it might attempt to download missing intermediate certificates from the network using the AIA URL. AIA therefore automates the retrieval of missing certificates and minimises the manual effort required to update local certificate stores. In most environments, the default AIA path will be LDAP. This works well for AD-only environments but will not support machines which are not domain-joined, for example, guest wireless, contractors, firewalls, other network or security appliances, etc. The standard for public PKI authorities is HTTP, which is what we will rely on in our example deployment. HTTP also works best when being published directly over the internet via DMZ; you would not want to do this using LDAP.
Here is the AIA path on the public cert for this blog, as you can see it is represented by a http://crt.sectigo.com path which points to a copy of the issuing CA certificate for *.amayacitta.co.uk.

Certificate Revocation List Distribution Point (CDP) is a path specified within certificates issued which contain a list of revoked thumbprints. CDP in the wider world is also known as Certificate Revocation List (CRL) – here is the CRL path for the issuing CA certificate for this blog. This file will be populated with certificate thumbprints which are revoked or banned by the CA, which in this example is Sectigo. There is additionally a concept of a delta CRL, which contains revocation information for certificates that have been revoked since the base CRL was last published, providing a way to increment revocation information over time.

The Online Certificate Status Protocol (OCSP) is an alternative to the certificate revocation list (CRL) and is used to check whether a digital certificate is valid or if it has been revoked. If you imagine a security incident against a public CA, let’s say 4,000,000,000 certificates have to be revoked. The CRL file would get very large and would be downloaded by all clients to determine if the certificate being used is valid or not, this becomes unmanageable. OCSP steps in here and allows for browsers to check the validity of a certificate without a full download of the CRL file. Additionally, OCSP stapling is a mechanism where the web server, instead of the browser, checks the certificate status with the OCSP responder and includes the response with the SSL/TLS handshake, improving performance.
OCSP can be configured in a Microsoft PKI environment, although I have done this on a number of larger installs, most customers (even big enterprises) are not trying to be true public (as in internet-facing) certificate authorities; their service is internal/corporate only. If the right precautions are taken, compromises within internal infrastructure are rare, so very high numbers of certificate revocations are seldom seen. Hence, OCSP is not as prevalent in my experience as a vanilla CRL.
Example Deployment Summary
The list below summarises the steps required to stand up a two-tier PKI with a single offline root and two subordinate servers. This is probably the best starting point for learning that covers areas of load balancing and high availability. Smaller environments can usually get away with just a single subordinate server.
Each of these areas will be unpacked further in the article.
- Deploy three Server 2025 servers, 1 workgroup, 2 domain-joined, all with static IP addressing.
- Place pre-prepared CAPolicy.inf files on each CA server to control deployment defaults.
- Configure DNS names for the CRL/AIA and PKI Web Services paths,
- Configure HTTP load balancing for the CDP and AIA paths.
- Create AD groups for delegated permissions.
- Prepare the OU structure for the subordinate issuing CA servers.
- Configure the auditing group policy object and configure Windows Firewall and other delegations.
- Deploy the required Windows roles and features to each server.
- Issue the root CA certificate on the standalone server and publish it into AD.
- Issue the Subordinate CA certificates to both domain-joined servers.
- Configure correct CDP and AIA paths over HTTP.
- Craft a CA template and publish to the issuing servers.
- Issue a test certificate.
Server Deployment
In the lab, the following servers have been deployed. The DNS aliases will point to a load balancer, which in turn will allow clients to reach the servers which are online. In Microsoft’s design documentation, the recommendation is to split the CDP/AIA paths onto separate servers from the CA roles. In my experience, this is seldom required and creates too much overhead for what is ultimately a very light service.
The main reason for full separation is to securely publish AIA and CRL paths to the public internet, so clients in the wild can perform revocation checking and potentially download the roots. If this sort of design is required, then I would deploy dedicated DMZ IIS server(s) specifically for this purpose and would have a public DNAT for HTTP only. The CDP and AIA paths would need to be populated, either from the configuration of the subordinates themselves or through scripting. I would then rely on split DNS to make the internal and Internet DNS resolution work using the same DNS records.
For the load balancer, you would typically deploy something with high availability. F5 LTM, NetScaler, KEMP, and HA Proxy are a few decent choices. I will use HA Proxy in this example environment.
| Server | Role | DNS Alias |
| rootca01.corp.aclab.uk | Offline Root | n/a |
| subca01.corp.aclab.uk | Issuing Subordinate Server 01 | pki.corp.aclab.uk – Web Enrollment crt.corp.aclab.uk – AIA HTTP Path crl.corp.aclab.uk – CDP HTTP Path |
| subca02.corp.aclab.uk | Issuing Subordinate Server 02 | pki.corp.aclab.uk – Web Enrollment crt.corp.aclab.uk – AIA HTTP Path crl.corp.aclab.uk – CDP HTTP Path |
| lb01.corp.aclab.uk | HA Proxy Load Balancer 01 | |
| lb02.corp.aclab.uk | HA Proxy Load Balancer 02 |
In the lab, each of the Sub CA servers is deployed into a specific AD site, which will allow us to configure site awareness. To achieve this, the following site arrangement is configured: the sites are very specific /28 networks within VMware NSX VPC subnets. The names are functionally labelled for the lab and wouldn’t reflect what would usually be present in production. Normally, AD sites represent geography and domain controllers are present to handle authentication requests to specific sites; CA servers would follow the same boundaries.

The Root and Subordinate servers were deployed clean from a VMware template, they were sysprepped and renamed according to the naming convention above. Note that Server 2025 does care about the use of sysprep. If skipped, you may run into NTLM and Kerberos authentication issues due to duplicate SIDs, as per this article from MS.

Certificate Services Deployment Defaults
CAPolicy.inf files were crafted and placed in C:\Windows on all three CA servers. These set the defaults when the certificate services roles are added.
Standalone Offline Root
[version]
Signature="$Windows NT$"
[Certsrv_Server]
RenewalKeyLength=4096
RenewalValidityPeriod=Years
RenewalValidityPeriodUnits=10
CRLPeriod=Years
CRLPeriodUnits=5
AlternateSignatureAlgorithm=0
Subordinate Issuing Root
[Version]
Signature="$Windows NT$"
[Certsrv_Server]
RenewalKeyLength=4096
RenewalValidityPeriod=Years
RenewalValidityPeriodUnits=10
CRLPeriod=Weeks
CRLPeriodUnits=1
LoadDefaultTemplates=0
AlternateSignatureAlgorithm=0
DNS Records
The following DNS names were configured for the load balancers, Certificate Web Services, AIA and CDP paths. The lbvip01 record will resolve to the load balancers’ VIP address, which is then referenced using CNAME aliases, so it’s easy to spot when you perform forward lookups.
Add-DnsServerResourceRecordA -Name lb01 -ZoneName corp.aclab.uk -IPv4Address 10.166.108.68
Add-DnsServerResourceRecordA -Name lb02 -ZoneName corp.aclab.uk -IPv4Address 10.166.108.69
Add-DnsServerResourceRecordA -Name lbvip01 -ZoneName corp.aclab.uk -IPv4Address 10.166.108.70
Add-DnsServerResourceRecordCName -Name pki -HostNameAlias lbvip01.corp.aclab.uk -ZoneName corp.aclab.uk
Add-DnsServerResourceRecordCName -Name crt -HostNameAlias lbvip01.corp.aclab.uk -ZoneName corp.aclab.uk
Add-DnsServerResourceRecordCName -Name crl -HostNameAlias lbvip01.corp.aclab.uk -ZoneName corp.aclab.uk
HA Proxy Load Balancing
Two Fedora 43 server virtual machines were deployed using a standard ISO build. Once booted, they were configured with a base HA proxy configuration using the below commands.
## System updates and package deployment
sudo -i
dnf update -y && dnf upgrade -y
dnf install haproxy keepalived -y

## configure selinux to allow haproxy to bind on any port
## https://access.redhat.com/solutions/3278691
setsebool -P haproxy_connect_any=1

## Configure firewall for CA paths and HA proxy stats page
## By default fedora uses a FedoraServer zone not public
firewall-cmd --permanent --zone=FedoraServer --add-port=80/tcp
firewall-cmd --permanent --zone=FedoraServer --add-port=8181/tcp
firewall-cmd --reload
firewall-cmd --list-all --zone=FedoraServer

## Backup default config and craft a new one
cp /etc/haproxy/haproxy.cfg /etc/haproxy/haproxy.cfg.bak
cat << EOF > /etc/haproxy/haproxy.cfg
#---------------------------------------------------------------------
# Global settings
#---------------------------------------------------------------------
global
    # to have these messages end up in /var/log/haproxy.log you will
    # need to:
    #
    # 1) configure syslog to accept network log events.  This is done
    #    by adding the '-r' option to the SYSLOGD_OPTIONS in
    #    /etc/sysconfig/syslog
    #
    # 2) configure local2 events to go to the /var/log/haproxy.log
    #   file. A line like the following can be added to
    #   /etc/sysconfig/syslog
    #
    #    local2.*                       /var/log/haproxy.log
    #
    log         127.0.0.1 local2

    chroot      /var/lib/haproxy
    pidfile     /var/run/haproxy.pid
    maxconn     4000
    user        haproxy
    group       haproxy
    daemon

    # turn on stats unix socket
    stats socket /var/lib/haproxy/stats

    # Default SSL material locations
    ca-base /etc/ssl/certs
    crt-base /etc/ssl/private

    # See: https://ssl-config.mozilla.org/#server=haproxy&server-version=2.0.3&config=intermediate
    ssl-default-bind-ciphers ECDHE-ECDSA-AES128-GCM-SHA256:ECDHE-RSA-AES128-GCM-SHA256:ECDHE-ECDSA-AES256-GCM-SHA384:ECDHE-RSA-AES256-GCM-SHA384:ECDHE-ECDSA-CHACHA20-POLY1305:ECDHE-RSA-CHACHA20-POLY1305:DHE-RSA-AES128-GCM-SHA256:DHE-RSA-AES256-GCM-SHA384
    ssl-default-bind-ciphersuites TLS_AES_128_GCM_SHA256:TLS_AES_256_GCM_SHA384:TLS_CHACHA20_POLY1305_SHA256
    ssl-default-bind-options ssl-min-ver TLSv1.2 no-tls-tickets

#---------------------------------------------------------------------
# common defaults that all the 'listen' and 'backend' sections will
# use if not designated in their block
#---------------------------------------------------------------------
defaults
    mode                    http
    log                     global
    option                  httplog
    option                  dontlognull
    option http-server-close
    option forwardfor       except 127.0.0.0/8
    option                  redispatch
    retries                 3
    timeout http-request    10s
    timeout queue           1m
    timeout connect         10s
    timeout client          1m
    timeout server          1m
    timeout http-keep-alive 10s
    timeout check           10s
    maxconn                 3000

#---------------------------------------------------------------------
# turn on stats page
#---------------------------------------------------------------------
frontend stats
    mode http
    bind *:8181
    stats enable
    stats uri /stats
    stats refresh 10s

#---------------------------------------------------------------------
# main frontend which proxys to the backends
#---------------------------------------------------------------------
frontend http
    bind *:80
    http-request add-header X-Forwarded-Proto http
    default_backend sub-ca-http

#---------------------------------------------------------------------
# back end for certificate services
#---------------------------------------------------------------------
backend sub-ca-http
    mode http
    option httpchk HEAD / HTTP/1.0
    server subca01 10.166.108.18:80 check weight 1 maxconn 1024
    server subca02 10.166.108.34:80 check weight 1 maxconn 1024
EOF

## Validate config file then start service
haproxy -f /etc/haproxy/haproxy.cfg -c
systemctl enable haproxy
systemctl start haproxy

## Backup the default keepalived config
cp /etc/keepalived/keepalived.conf /etc/keepalived/keepalived.conf.bak

## Allow a floaty address and validate
echo "net.ipv4.ip_nonlocal_bind = 1" >> /etc/sysctl.conf
reboot
/usr/sbin/sysctl net.ipv4.ip_nonlocal_bind
Additionally, the first load balancer was configured with the following keepalived config, which sets the server to be MASTER as 255 is the maximum priority in VRRP.
## Add keepalived configuration to the primary load balancer lb01
## This will be made MASTER due to 255 priority, higher is better
cat << EOF > /etc/keepalived/keepalived.conf
! Configuration File for keepalived

global_defs {
}

vrrp_track_process haproxy {
    process haproxy
    quorum 1
    delay 2
}

vrrp_instance VI_100 {
    state MASTER
    interface ens33
    virtual_router_id 100
    priority 255

    authentication {
        auth_type PASS
        auth_pass 38kCC!9L^BWU
    }

    virtual_ipaddress {
        10.166.108.70/28
    }

    unicast_src_ip 10.166.108.68

    unicast_peer {
       10.166.108.69
    }

    track_process {
        haproxy
    }
}
EOF

## Start service
systemctl enable keepalived
systemctl start keepalived
And the second load balancer was configured with the following keepalived config, which sets the server to be BACKUP as the default priority is 100, which is lower than the first server with 255.
## Add keepalived configuration to the secondary load balancer lb01
## This will be made BACKUP due to no priority, default is 100
cat << EOF > /etc/keepalived/keepalived.conf
! Configuration File for keepalived

global_defs {
}

vrrp_track_process haproxy {
    process haproxy
    quorum 1
    delay 2
}

vrrp_instance VI_100 {
    state BACKUP
    interface ens33
    virtual_router_id 100

    authentication {
        auth_type PASS
        auth_pass 38kCC!9L^BWU
    }

    virtual_ipaddress {
        10.166.108.70/28
    }

    unicast_src_ip 10.166.108.69/28

    unicast_peer {
       10.166.108.68
    }

    track_process {
        haproxy
    }
EOF

## Start service
systemctl enable keepalived
systemctl start keepalived
One complete, you can confirm the current state by doing a straightforward “ip a” on the first load balancer. You can see the physical address of 10.166.108.68 and the VRRP VIP of keepalived on 10.166.108.70.

You can also look at the journal for keepalived, and it will show the current state.
journalctl -u keepalived | grep STATEIf you stop HAProxy on the primary load balancer, the IP will move to the secondary.
## Run from secondary
journalctl -u keepalived.service -f

## Run from primary and watch the log on the secondary
systemctl stop haproxy

## Log extract from the secondary
Feb 14 23:04:02 lb02.aclab.uk Keepalived_vrrp[8123]: (VI_100) Entering BACKUP STATE
Feb 14 23:04:02 lb02.aclab.uk Keepalived_vrrp[8123]: (VI_100) removing VIPs.
Feb 14 23:04:16 lb02.aclab.uk Keepalived_vrrp[8123]: (VI_100) Backup received priority 0 advertisement
Feb 14 23:04:16 lb02.aclab.uk Keepalived_vrrp[8123]: (VI_100) Backup received priority 0 advertisement
Feb 14 23:04:16 lb02.aclab.uk Keepalived_vrrp[8123]: (VI_100) Receive advertisement timeout
Feb 14 23:04:16 lb02.aclab.uk Keepalived_vrrp[8123]: (VI_100) Entering MASTER STATE
Feb 14 23:04:16 lb02.aclab.uk Keepalived_vrrp[8123]: (VI_100) setting VIPs.
Feb 14 23:04:16 lb02.aclab.uk Keepalived_vrrp[8123]: (VI_100) Sending/queueing gratuitous ARPs on ens33 for 10.166.108.70
Feb 14 23:04:16 lb02.aclab.uk Keepalived_vrrp[8123]: Sending gratuitous ARP on ens33 for 10.166.108.70
The VRRP VIP will have moved, which you can easily check with “ip a”. If you then start haproxy on the primary load balancer, within seconds the VRRP VIP moves back. This concludes the testing and setup for the load balancers.

Delegated Permission Groups
The following commands were run on the domain controller to prepare a delegated administrative group. These will be bound to different parts of the environment at a later date.
New-ADGroup -Name "Certificate Administrators" -GroupScope DomainLocal -Description "Members are granted full Certificate Services Administrator rights" -Path "OU=Groups,DC=corp,DC=aclab,DC=uk"
New-ADGroup -Name "Certificate Template - SAN" -GroupScope DomainLocal -Description "Members are granted rights to issue SAN certificates in the environment, add computer objects as required" -Path "OU=Groups,DC=corp,DC=aclab,DC=uk"
OU and GPO Preparation
The following OU and GPO are configured to enable advanced auditing of certificate services, delegate Certificate Administrators to local administrators on the issuing subordinate servers and enable HTTP inbound on Windows Firewall.

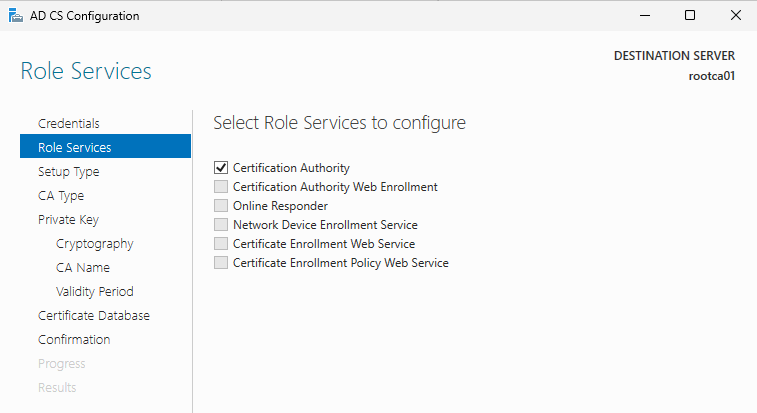
Deploy and Configure the Offline Root CA Roles
To deploy the roles, the following commands were run. Before doing this double-check that the CAPolicy.inf is in place in C:\Windows.
Install-WindowsFeature AD-Certificate,RSAT-ADCS-MgmtTo bring a bit more security, create a new local administrator and disable the default one. Ensure the new user is part of the default Administrators group before logging off and back in as that user.

Load the server manager and complete the CA setup. Below are the values used.


Although Elliptic Curve Cryptography (ECC) offers better performance and strong security with much smaller keys, RSA still remains dominant and is universally trusted.
If using ECC read this compatibility article for supported browsers and web servers.

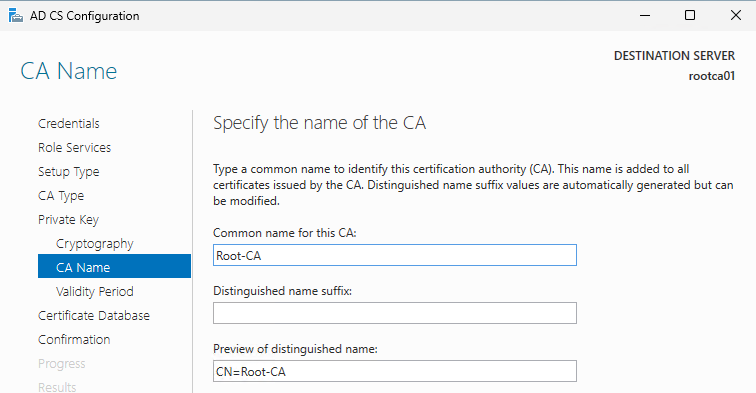
For security, don’t use the hostname in the CA name; use something simple that masks the true name of the server. Here is a straightforward generic example.
Validity lengths are getting commonly smaller these days, and often internal security scanners like Tenable or Qualys pick up on certificates that are too lengthy. As this is an internal-only PKI, 10 years is more convenient and requires less maintenance. Of course, feel free to use 2 years or less, but you will probably be playing catch-up all the time, renewing the roots across your environment (think of all those non-AD integrated appliances). Make sure you consider the validity period very carefully.


Complete the following commands to configure the offline root.
Certutil -setreg CA\DSConfigDN "DC=corp,DC=aclab,DC=uk"
Certutil -setreg CA\AuditFilter 127
certutil -setreg CA\CACertPublicationURLs "1:C:\Windows\system32\CertSrv\CertEnroll\%1_%3%4.crt\n0:ldap:///CN=%7,CN=AIA,CN=Public Key Services,CN=Services,%6%11\n2:http://crt.corp.aclab.uk/CertEnroll/%1_%3%4.crt"
certutil -setreg CA\CRLPublicationURLs "1:C:\Windows\system32\CertSrv\CertEnroll\%3%8%9.crl\n0:ldap:///CN=%7%8,CN=%2,CN=CDP,CN=Public Key Services,CN=Services,%6%10\n2:http://crl.corp.aclab.uk/CertEnroll/%3%8%9.crl"
Certutil -setreg CA\ValidityPeriodUnits 10
Certutil -setreg CA\ValidityPeriod "Years"
certutil -setreg CA\CRLDeltaPeriodUnits 0
certutil -setreg CA\CRLOverlapPeriod "Months"
certutil -setreg CA\CRLOverlapUnits 3
Restart-Service CertSvc -passthru
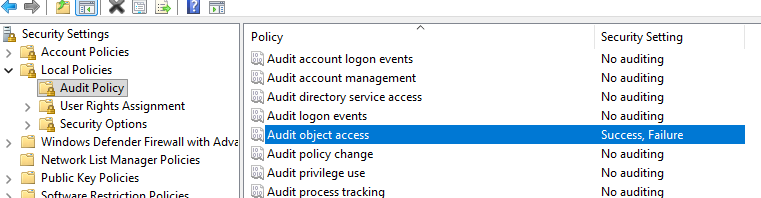
certutil -crlRun secpol.msc and set object access to success and failure.
Deploy and Configure the Issuing Subordinate CA Roles
Copy the CRL and CRT files from C:\Windows\System32\CertSrv\CertEnroll from the root CA to C:\temp on each subordinate server. Also, ensure the CAPolicy.inf file is stored in C:\Windows. Perform the following commands on just one of the sub CA servers.
certutil -f -dspublish "C:\Temp\rootca01_Root-CA.crt" RootCA
certutil -f -dspublish "C:\Temp\Root-CA.crl" rootca01
The commands below need to be run on both servers; they will force the download of the AD published root CA and CRL file, then install the base roles and RBAC tools. We will also set up a directory for our new CDP/AIA path.
gpupdate /force
New-Item -ItemType Directory -Path C:\Certsrv
Install-WindowsFeature AD-Certificate,RSAT-ADCS-Mgmt,ADCS-Web-Enrollment,Web-Mgmt-Console,FS-DFS-Replication,RSAT-File-Services,RSAT-DFS-Mgmt-Con
Perform the following commands on just one server. As we do not have a highly available CIFS share for the AIA/CDP location, we will be using DFS-R (without a DFS namespace) to replicate C:\Certsvc between each Subordinate CA. This allows for the weekly Sub CA CRL updates to propagate, and the HTTP load balancer will handle failures and keep the paths online between both of the servers. If the environment had a central CIFS share which is highly available, you can use this to publish the CDP paths and link IIS directly to the UNC path. This would then be available over HTTP via the load balancer.
New-DfsReplicationGroup -GroupName Certsrv | New-DfsReplicatedFolder -FolderName C:\Certsrv | Add-DfsrMember -ComputerName "SubCA01","SubCA02"
Add-DfsrConnection -GroupName Certsrv -SourceComputerName SubCA01 -DestinationComputerName SubCA02
Set-DfsrMembership -GroupName Certsrv -FolderName c:\Certsrv -ContentPath C:\Certsrv -ComputerName SubCA01 -PrimaryMember $True -StagingPathQuotaInMB 4096 -Force
Set-DfsrMembership -GroupName Certsrv -FolderName c:\Certsrv -ContentPath C:\Certsrv -ComputerName SubCA02 -StagingPathQuotaInMB 4096 -Force
Update-DfsrConfigurationFromAD –ComputerName SubCA01,SubCA02
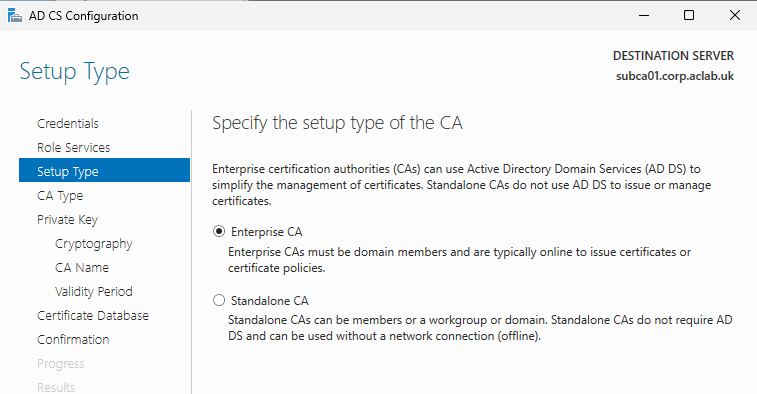
Get-WinEvent "DFS Replication" -MaxEvents 3 | flLoad Server Manager and complete the CA setup on both subordinates. Below are the values used for the one; the other one follows the same, but changes the naming.


For security reasons, do not use the hostname of the server; below is a generalised name. If you are following this and doing SubCA02, remember to change the common name.

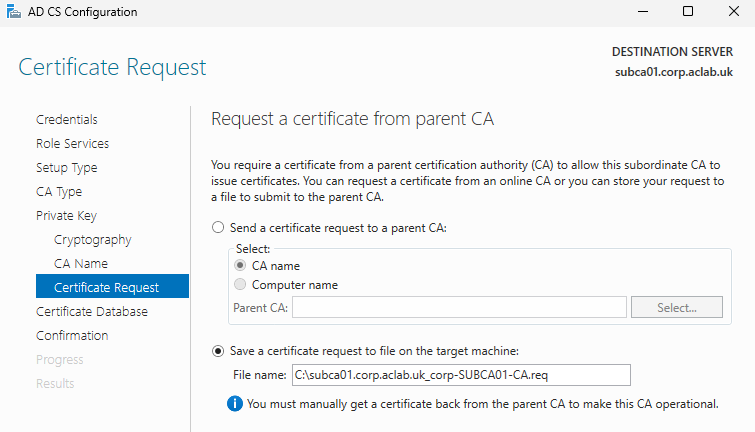


The warnings below are normal. We next need to get the CSR from the SubCA and issue it from the root.

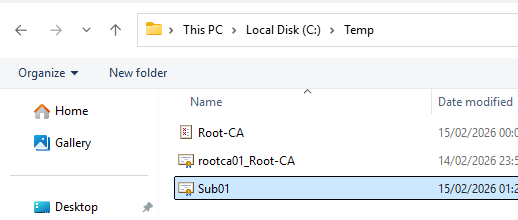
To do this copy the req file the wizard created over to the Root CA C:\Temp folder.

From the Root CA console, right-click> All Tasks > Submit new request. Browse to C:\Temp and select the req file.
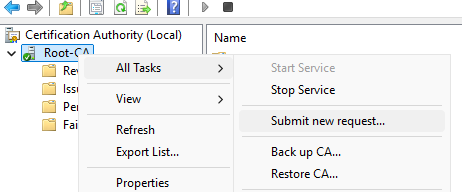
Under pending requests, right-click and issue.

Under Issued certificates, double click the SubCA cert, go to details and click copy to file, export as a DER file to C:\Temp and then transfer it to C:\Temp on the SubCA itself.

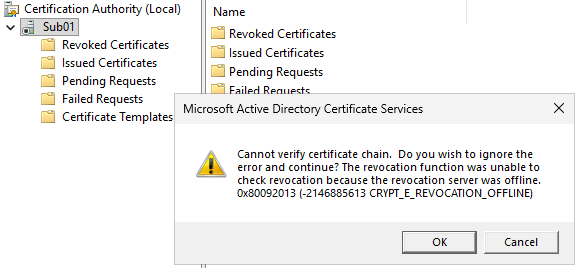
From the SubCA certificate console, right click > All Tasks > Install CA cert and select the file we just copied into C:\Temp

Ignore the revocation error for now; this just means the CRL is not available on HTTP yet. Had we also included LDAP, this would not have occurred. We are using HTTP only as it’s best for client compatibility.
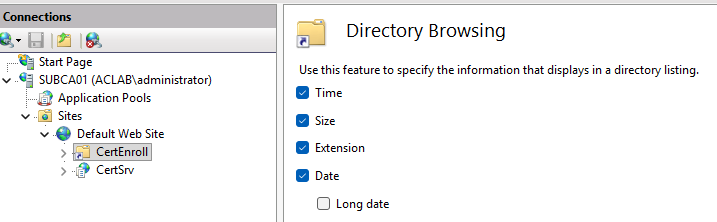
Copy the CA Root, CA Root CRL and Subordinate certificates from C:\Temp and place them in C:\Certsrv. From IIS Manager on the SubCA, click CertEnroll, select advanced settings and change the physical path. This new path is replicated between both Subordinate Servers, and is also backed by the load balancer we deployed earlier.

Enable directory browsing, which makes things easier.
Complete the following on both Subordinate CA servers, with the HTTP CDP path now fully configured, the prior error will not be there.
Copy-Item C:\Windows\System32\certsrv\CertEnroll\*.crt C:\Certsrv
Certutil -setreg CA\AuditFilter 127
certutil -setreg CA\CACertPublicationURLs "1:C:\Windows\system32\CertSrv\CertEnroll\%1_%3%4.crt\n0:ldap:///CN=%7,CN=AIA,CN=Public Key Services,CN=Services,%6%11\n2:http://crt.corp.aclab.uk/CertEnroll/%1_%3%4.crt"
certutil -setreg CA\CRLPublicationURLs "65:C:\Windows\system32\CertSrv\CertEnroll\%3%8%9.crl\n0:ldap:///CN=%7%8,CN=%2,CN=CDP,CN=Public Key Services,CN=Services,%6%10\n6:http://crl.corp.aclab.uk/CertEnroll/%3%8%9.crl\n65:file://C:\Certsrv\%3%8%9.crl"
Certutil -setreg CA\ValidityPeriodUnits 10
Certutil -setreg CA\ValidityPeriod "Years"
certutil -setreg CA\CRLDeltaPeriodUnits 0
certutil -setreg CA\CRLOverlapPeriod "Days"
certutil -setreg CA\CRLOverlapUnits 3
Restart-Service CertSvc -passthru
certutil -crl
From the certificate services console on each subordinate CA server, right-click the server, click properties and bind the delegated AD group to the security permissions. Assign Issue and Manage Certificates and Manage CA.

Load pkiview.msc and confirm that the health of the root and subordinates reports OK.

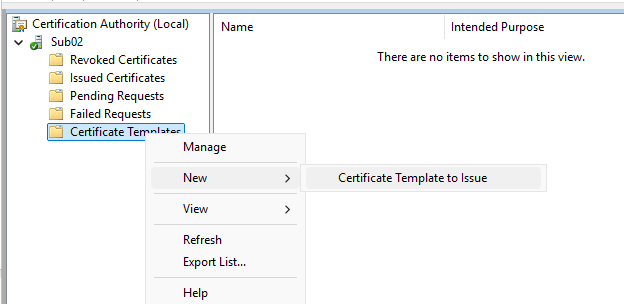
Publish Certificate Templates
Although the setup is good, due to the value LoadDefaultTemplates=0 in CAPolicy.inf, there are no templates published. From one of the CA servers, right-click Certificate Templates and click Manage.

Click properties on the Kerberos Authentication Template, and under Superseded Template,s add both Domain Controller and Domain Controller Authentication. On both of the CA Issuing servers, publish Kerberos Authentication.
Enable Autoenrollment against the Domain Controllers.
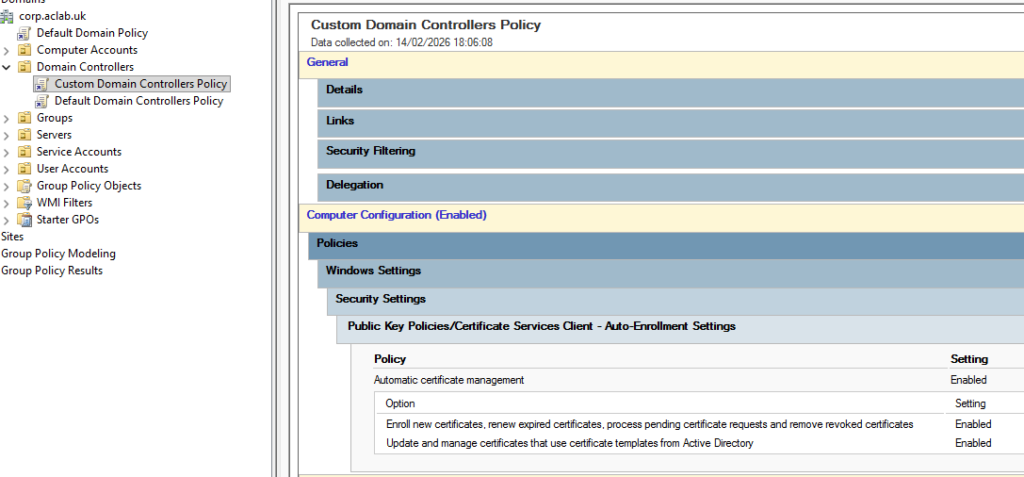
Then run the following commands on a DC.
gpupdate /force
certutil -pulse
If you open certlm.msc on a Domain Controller, you can see the automatically enrolled cert and confirm the CRL and AIA paths.

Lastly, go back into template management by right-clicking on Certificate Templates.
Right-click on Web Server and click Duplicate Template. Do not click Apply or OK on the window that pops up; this will lock in certain settings.

Change the compatibility settings.

Change the name and the validity as required on the general tab.

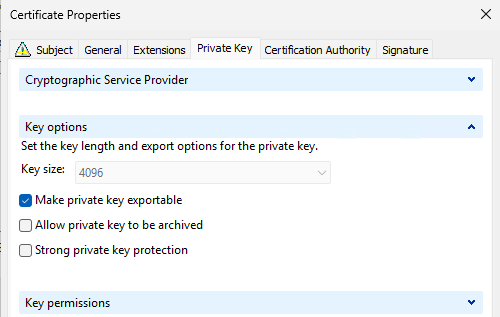
Allow the private key to be exported on request handling.

Change the following settings on the Cryptography tab.

Grant the delegated group Enrol permissions, click Apply, then OK.

Publish the template onto both SubCA servers.


Site Awareness
Now we can play with CA site awareness. In this lab, I don’t have regular servers in the CA Sites; they were specifically crafted just for this blog. To test, I will be showing you how to issue certs from the SubCA servers themselves. In order for this to work more generally, you place the computer objects you want to issue certs from in the delegated AD group we created earlier. Note that the server or client will need a reboot to pick up the group membership.

To configure AD site awareness, run the following command from either of the subordinate CA servers.
certutil -f -setcasites set
certutil | findstr "Config"
From SubCA01, load certlm.msc and right-click Personal> Certificates, then select Request New Certificate.

Click next and next until you get to the AD enrollment policy screen. Click the blue more information link. As this is a SAN-based template, we have to supply the details in the request. For this test, we will issue a wildcard, place *.corp.aclab.uk in both the common name and the DNS alternative name.

If you only plan to use the certificate on the system you are issuing the cert to, unselect make private key exportable. This helps protect it as it can’t be reused anywhere else.
Under certificate authority, we could select just one SubCA; however, we want to test CA site awareness, so leave this as-is. The client (in this case, SubCA01 itself) will query AD for its own AD site name, then determine which CA to use by leveraging AD DS site link cost from the client site to each target CA site. The following logic occurs.
- Each set of CAs that has identical costs will be ordered randomly within that set to evenly distribute the load.
- Enrollment is attempted through the lowest cost CAs (the smallest numeric site cost value).
- If contacting that CA fails, the next higher cost CAs are tried.
- If none of the CAs (that allow Enrol permission and publish the relevant template) are accessible or responding, the enrollment request fails.
- Since all Enterprise CAs expect DCOM calls and utilise Kerberos credentials, the type of credentials required by the CA does not affect the CA ordering.
- None of the client site cost processing and CA ordering operations results in contacting any of the CAs; only AD DS queries and an AD DS site cost query calls are made.
- If site cost collection is not enabled on the client, the CAs will be ordered randomly.

Click OK, which returns to the prior screen with all the details entered. Tick the box next to the template name and then click enrol.

After a few seconds the enrollment should succeed.
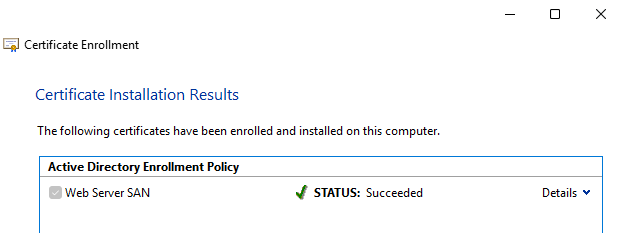
Investigating the certificate, it should come from the local AD site, which just happens to be itself in this lab example. If this were a server or a client, it would try to use the CA server in the local AD site.

What’s Next
This concludes this particular article. I hope it was helpful to make PKI a bit more graspable. At some point, I will write other articles on common scenarios which challenge organisations, and common questions I get with my clients are:
- The current certificate roots are due to expire next year. How do I safely renew them without breaking my environment? We heavily rely on technologies such as Credential Guard and 802.1x wireless.
- How do we move from an older Windows operating system to a newer one? Our cyber guys are putting pressure on us to get onto later versions.
- Our PKI is so broken and bad that we want a new one. How do we migrate to a greenfield deployment and retain service in our environment?
If there is any particular question you have, perhaps unique to your environment, feel free to place a comment.