If you’ve been following along, this is the fourth part in the “Perfect PKI” series. In this article we will be exploring how we replace an existing PKI hierarchy with a fresh one. Usually, this is done when the old hierarchy is not in a fit state and the effort to remediate it isn’t worth it. Maybe it’s a double wammy of being on old unsupported operating systems and also not configured well.
Four Part Series
This article is part of a four-part series.
- Part #1 – Deploying and Understanding PKI
- Part #2 – How to safely renew root certificates
- Part #3 – How to upgrade the CA Operating Systems
- Part #4 – How to replace an existing PKI hierarchy
Navigation
- Four Part Series
- Introduction
- Add a second PKI hierarchy
- Distribute root certificates
- Migrate Certificate Templates
- Decommission old PKI
- Conclusion
Introduction
In order to reach the goal, the high level steps are:
- Stand up a new environment alongside the existing, using different server and certificate names. You could also re-use the same offline root, if that is healthy.
- Import the subordinate and offline root certificates into any appliances which need certificates (firewalls, load balancers, proxies etc)
- Push the root certificate through Intune if used. This ensures autopilot machines build properly, especially when you have a distributed workforce or are using, for example, Microsoft AlwaysOn VPN.
- Migrate all the certificate templates from the existing to the new setup. This may require an understanding of how the templates are used in the environment. Please follow the planning guidance in part 2.
- Once all templates are removed from the old hierarchy, fully decommission it.
Add a second PKI hierarchy
I’m not going to go over the base deployment of a two-tier PKI as this has already been covered in part 1. Please follow the part 1 guide, deploying a parallel two-tier hierarchy. Use different names for the servers and the CA certificates. My new server names were not very inventive.
If the configuration problems are more to do with the subordinates than the offline root, one option is to only deploy new subordinates and link them to the existing offline root. If your operating system is out of date on the offline root, follow the steps in part 3 to migrate the offline root to a new OS version first. You will have to adapt the article slightly as it was written for the migration of a subordinate. However, the export/import of the database, private key etc process is identical to the offline root.
Personally, I recommend retaining the same AIA and CDP paths, remembering that although they share a common path, the AIA and CRL file names will be different. If you have followed part 1, you will have a C:\Certsrv folder as a DFS-R replicated path, backed by IIS on HTTP. You can simply add the additional subordinate issuing server(s) into the DFS-R topology. Below shows the commands for the new subordinates for the new hierarchy, aptly named SubCA03 and SubCA04.
Get-DfsReplicationGroup -GroupName Certsrv | Add-DfsrMember -ComputerName SubCA03,SubCA04
Add-DfsrConnection -GroupName Certsrv -SourceComputerName SubCA01 -DestinationComputerName SubCA03
Add-DfsrConnection -GroupName Certsrv -SourceComputerName SubCA01 -DestinationComputerName SubCA04
Add-DfsrConnection -GroupName Certsrv -SourceComputerName SubCA02 -DestinationComputerName SubCA03
Add-DfsrConnection -GroupName Certsrv -SourceComputerName SubCA02 -DestinationComputerName SubCA04
Add-DfsrConnection -GroupName Certsrv -SourceComputerName SubCA03 -DestinationComputerName SubCA04
Set-DfsrMembership -GroupName Certsrv -FolderName C:\Certsrv -ContentPath C:\Certsrv -ComputerName SubCA03 -StagingPathQuotaInMB 4096 -Force
Set-DfsrMembership -GroupName Certsrv -FolderName C:\Certsrv -ContentPath C:\Certsrv -ComputerName SubCA04 -StagingPathQuotaInMB 4096 -Force
Update-DfsrConfigurationFromAD –ComputerName SubCA01,SubCA02,SubCA03,SubCA04
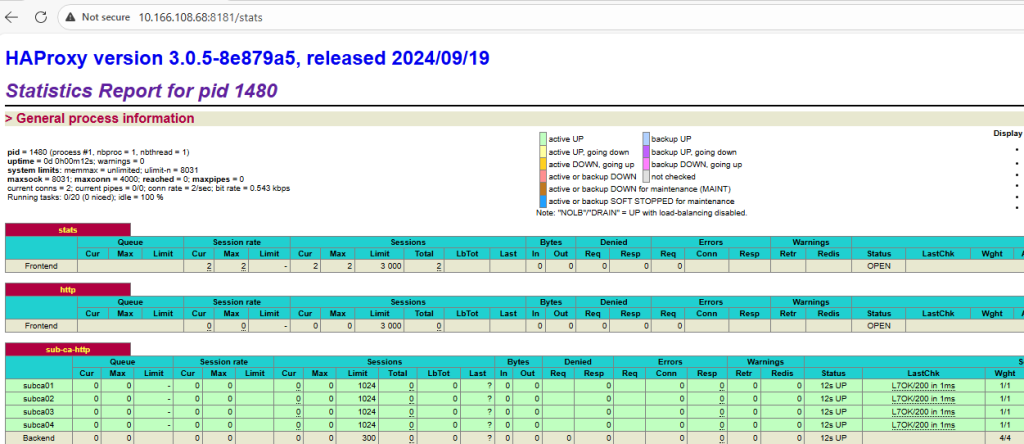
Get-WinEvent "DFS Replication" -MaxEvents 3 | flYou can then include all four subordinate servers in the load balancer by modifying the back end /etc/haproxy/haproxy.cfg file. This keeps everything clean and simple. Once we get to the point of decommissioning the old hierarchy, the old lines can be removed or just commented out. Please see part 1 if you’re unsure about the HA Proxy configuration.
#---------------------------------------------------------------------
# back end for certificate services
#---------------------------------------------------------------------
backend sub-ca-http
    mode http
    option httpchk HEAD / HTTP/1.0
    server subca01 10.166.108.18:80 check weight 1 maxconn 1024
    server subca02 10.166.108.34:80 check weight 1 maxconn 1024
    server subca03 10.166.108.19:80 check weight 1 maxconn 1024
    server subca04 10.166.108.35:80 check weight 1 maxconn 1024
EOF
If you load the stats page, you can check if the connections are successful.
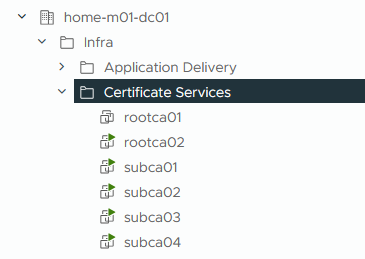
Following the deployment of a second PKI hierarchy in the lab, this is what pkiview.msc looks like. We have a new offline root and two subordinates, all sharing the same AIA and CDP paths.

Distribute root certificates
Following the deployment of the second hierarchy, domain-joined Windows clients, servers etc. will automatically download the new certificates on their next refresh. If they are connected to the network, this is usually within 90 minutes.
If you use Azure and Intune, you should also publish the root and subordinates here, so they are available for any new Autopilot builds. You will also need to manually publish to your wider non-domain-joined devices, i.e. firewalls, load balancers and the like.
Migrate Certificate Templates
Once the new root certificates are distributed, over time we are going to need to replace certificates with ones from the new subordinates. Principally, we have already unpacked this in part 2. We first need to understand how certificates are used in the environment and gradually replace them. For services which have a deeper tie in, like client certificate authentication on 802.1x wireless or VPN technology, we need to be careful with ordering. Please read part 2 in detail, in particular the planning and example template migration sections.
For server-based certificates, i.e. web servers etc, we can simply just renew these over time. You can make a choice to leave both PKI hierarchies in place for a decent length of time, whilst you gradually renew certificates. Or you can set up a special task force to tackle them quicker. The choice is yours. Where you can, try and employ Auto-enroll as it will save some time.
Once you have identified the templates to which you want to migrate, the task is to remove them from the old subordinates by deleting them from the certificate template section. Note, this does not delete them from Active Directory, templates themselves remain in the forest.
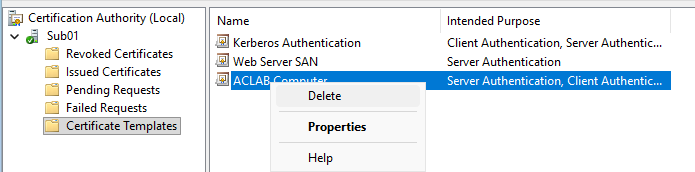
Then add them to the new subordinates by going to the standard certificate services console, right-clicking certificate templates > new > certificate template to issue. In the lab, we issue all templates to all subordinates and rely on site awareness to select the correct subordinate. This is further unpacked in part 1.

When all templates are migrated, you can issue certificates from the new subordinates. These can be done incrementally over time.
Decommission old PKI
When the old subordinates have no templates published, they are removed from issuing responsibilities. The last thing to do is decommission them. The Microsoft master document on this process is here. Some steps are confusing or not that relevant, in my opinion. Below is what I do when decommissioning CA servers.
- The first step is to revoke all certificates that have been previously issued. Only do this if you are absolutely certain certificates are not used in the current hierarchy. If you can, it’s easier to skip this step and allow them to naturally expire, remembering that no more certificates can be issued anyway.
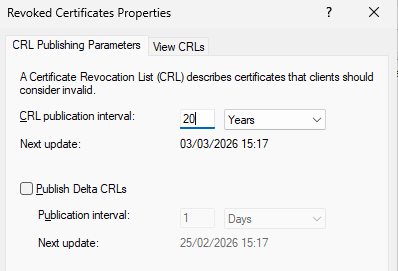
- From the certificate services console in both offline root and the subordinates, right click on revoked certificates > properties. Change the CRL interval to a time that is beyond the lifetime that remains for any certificates that are currently issued in the old hierarchy. You can set it to 20 years or a value beyond the expiry of the subordinate root certificate. As any issued certificates can not go beyond this date, you will be covered.
- Publish an updated CRL file onto the CDP path by running the below command. For the subordinates, this will be distributed to your HTTP load-balanced servers. If you open the CRL file for each subordinate, you will see the next update value is far off into the future. This file can now remain in place until all issued certificates on the old PKI have fully expired. For the offline root, you will need to manually copy the CRL file into the CDP path by following the guide in part 2.
certutil -crl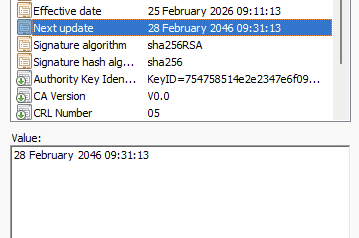
- The next step is to deny any pending requests, as the CA role is about to be removed and the server deleted. Personally, I skip this step as it’s all about to be destroyed anyway.
- At this point, remove the old servers from the CDP paths by commenting them out in the /etc/haproxy/haproxy.cfg file and rebooting the service. You can use sed to do this quickly. Remember to do it on both load balancers. Once done, the two new servers will be the only ones hosting the AIA and CDP paths.
sed -i 's/server subca01/#server subca01/' /etc/haproxy/haproxy.cfg
sed -i 's/server subca02/#server subca02/' /etc/haproxy/haproxy.cfg
systemctl restart haproxy
- For the offline root, you can simply shutdown and delete the server. It has no direct tie in to Active Directory.
- For the subordinates, uninstall the CA roles and the DFS-R configuration by running the below commands.
## Remove the web enrolment role first from both subordinates.
Remove-WindowsFeature ADCS-Web-Enrollment

## Remove all DFS-R connections which related to the subordinate servers we are decommissioning.
## Commands only have to be run from a single subordinate
Get-DfsrConnection | ? {($_.DestinationComputerName -eq "SUBCA01") -or ($_.DestinationComputerName -eq "SUBCA02")} | Remove-DfsrConnection
Get-DfsrConnection | ? {($_.SourceComputerName -eq "SUBCA01") -or ($_.SourceComputerName -eq "SUBCA02")} | Remove-DfsrConnection

## Check to see only SUBCA03 and SUBCA04 remain.
Get-DfsrConnection | ft SourceComputerName,DestinationComputerName

## Remove DFS-R membership and confirm only SUBCA03 and SUBCA04 remain.
Get-DfsrMembership | ? {($_.ComputerName -eq "SUBCA01") -or ($_.ComputerName -eq "SUBCA02")} | Remove-DfsrMember
Restart-DFSR
Get-DfsrMember | ft ComputerName

## Remove all other roles.
Remove-WindowsFeature AD-Certificate,RSAT-ADCS-Mgmt,Web-Mgmt-Console,FS-DFS-Replication,RSAT-File-Services,RSAT-DFS-Mgmt-Con- Once the uninstallation is complete, from pkiview.msc the following will be seen. The prior hierarchy has gone. However, there are lingering objects still in Active Directory.

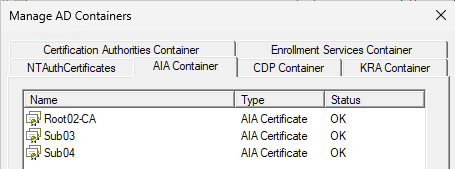
- If you right-click Enterprise PKI > Managed AD containers, there are several tabs which, when reviewed, will show information relating to the prior configuration. Because our installation was only doing AIA and CDP via HTTP, technically we can remove the old offline root and subordinates from the LDAP-based AIA and CDP containers. If your environment is linked to LDAP for AIA/CDP, then leave these as they are. You can come back after the expiry of the last certificate ever issued and remove them then (time for a future diary entry!).

- The NTAuthCertificate paths are automatically populated when deploying a domain-joined enterprise certificate authority. These objects are used to authorise certificate authorities for certificate-based logins, leave them as they are until after the expiry of the last certificate ever issued.
- The Enrolment services container is automatically tidied up when you remove the roles from the subordinates, so there is nothing to do here.
- If you open adsiedit.msc from a domain controller, then connect to the configuration container, there are more things to tidy up within “CN=Public Key Services,CN=Services,CN=Configuration,DC=corp,DC=aclab,DC=uk”.

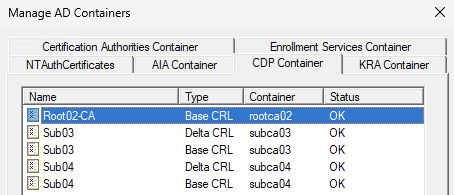
- The CDP entries can be removed as we are only using HTTP in our environment. If LDAP is used, leave these alone until after the expiry of the last certificate ever issued.
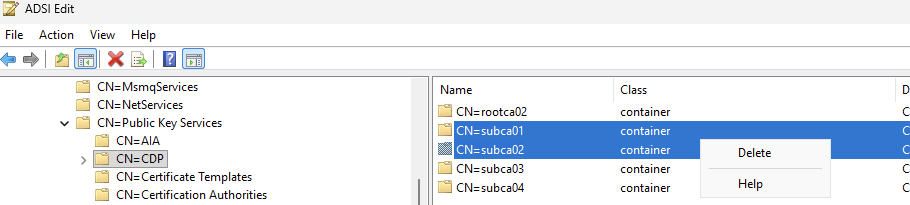
- Remove the old offline root.

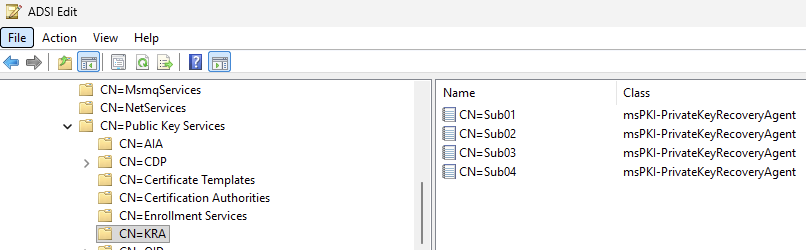
- Leave the KRA objects in place until after the expiry of the last certificate ever issued.
- Deleting the CA database can be skipped as the server is about to be decommissioned / deleted anyway.
- To clean up domain controllers, you can run the below command which will validate the domain controller and remove any that do not pass. Personally, I skip this step, as we would have already re-issued Kerberos templates via Auto-enroll as part of the template migration. I’m not that bothered about old certificates as they will not be used and over time will get purged with new builds etc.
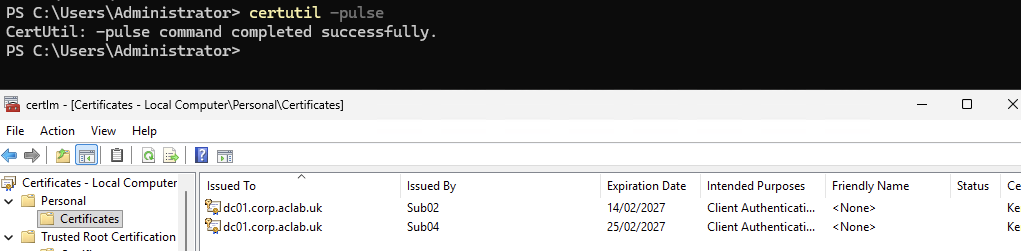
certutil -dcinfo deleteBad- Finally, re-run pkiview.msc and double check that everything looks good. I would also perform a certificate issue test. Below shows a new Kerberos certificate being issued against Sub04.

Conclusion
This concludes this article and for now the Perfect PKI series. If you have any questions you want to ask, please post them in the comment section. Until then, I hope you enjoyed the series and found it useful.